Saturday, March 29, 2008

Testing blockquote for blogger

Not sure what is wanted. Going to make a test post and see if the is what he wants:

This paragraph uses blockquote to indent it. Is this what you want? If so, leave a comment. Whatever, feedback highly welcomed


This is a normal paragraph.

Test float photo caption to the left

Papaya fruit
I did some posts on caption for photo at How to add a caption to an image uploaded via the Blogger upload icon and Captions and titles for images in blog posts. Now a blogger wants to know how to do it with the photo to the left. As I have never done it before, I am going to test it first before I publish the instructions.

Papaya Fruit
This is a photo of a payaya fruit sliced into half. It is very healthy to eat lots of fruits plus I think payaya fruit may have carotene, something that can help prevent various kinds of cancer.

Let us see if this paragraph of text will wrap around the photo. I doubt it, but just had to try.

RESULT OF TEST: The first one seem OK. As you can see, the paragraphs of text wrap around the photo in that case, but result a bit confusing in the second and third.

Sunday, March 02, 2008

LiveVideo: testing how to embed into post

Alerted to an alternative to Youtube and Google Video by a friend - LiveVideo. I know nothing about LiveVideo and just wanted to test to see if uploading a video, one can get script to embed into a blog post. It turned out that we can, any you can see from the video below titled "Listen to a Chinaman Blog*Star speak". Now please don't pass judgement too quickly as that Chinaman Blog*Star is not a native English speaker, but he sure can write well as you can see from comments left by grateful bloggers. So please do not leave comments like "what a funny Chinaman".


Instruction on how to fit LiveVideo video into your blog

Now each template are different and fluid width template templates are harder to deal with as the width expand and contract according to the width of the monitor of a visitor. This template is of fixed width and the width of the main column in which this post is contained is 400 pixels. Below in the scroll box is the script obtained from LiveVideo with the width and the height of the original video highlighted in red:

<div><embed src="http://www.livevideo.com/flvplayer/embed/AAB7A041CBC74C87B5DA2FAB73E51E92" type="application/x-shockwave-flash" quality="high" WIDTH="445" HEIGHT="369" wmode="transparent"></embed><br/><a href="http://www.livevideo.com/video/embedLink/AAB7A041CBC74C87B5DA2FAB73E51E92/545170/listen-to-this-chinaman-blog-s.aspx">Listen to this Chinaman Blog*Star speak</a></div>


Now if I am to just paste the above code direct into the post editor window, it will be too wide for the main column, so I have to edit it to 400 pixels instead of 445 pixels. But wait, if you do that, the video will become distorted! You must change the height as well in such a way as to keep the aspect ratio constant.

How I do it is as follows: I open the free and very good Irfanview photo editor, click "Image" in the menu bar at the top and select "Create New (empty) image". You will get a pop up where you can create an image the same size as the video - 445x369 pixels (see screenshot below):
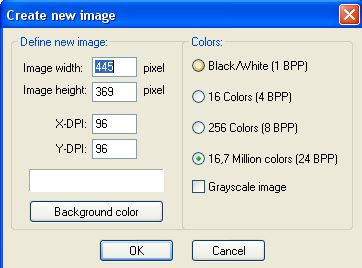
Irfanview create new image

Now all I have to di is to enter 445 for the height and 369 for the width for the new image to be created. Click "OK" and an image of the same size as the video will be create. Now I click on "Image" in the menu bar and select "Resize/resample" and just make sure the radio button beside "Preserve aspect ratio" is ticked, the enter 400 for the width and you will notice that the height automatically changed to 332.
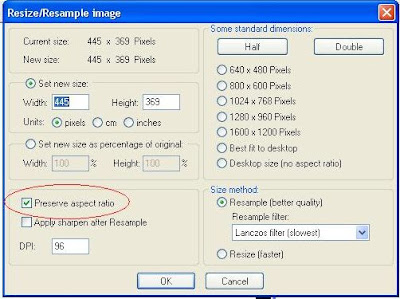
Irfanview resize image or photo

Take note of that, edit the script accordingly and in the scroll box is the script I used to embed that "Chinaman Blog*Star speaking" video above:

<div><embed src="http://www.livevideo.com/flvplayer/embed/AAB7A041CBC74C87B5DA2FAB73E51E92" type="application/x-shockwave-flash" quality="high" WIDTH="400" HEIGHT="332" wmode="transparent"></embed><br/><a href="http://www.livevideo.com/video/embedLink/AAB7A041CBC74C87B5DA2FAB73E51E92/545170/listen-to-this-chinaman-blog-s.aspx">Listen to this Chinaman Blog*Star speak</a></div>


Now if your template is not the same as mine, its widths will likely not be the same. You will have to refer to How to find the width of your blog Header, main column and sidebar or sidebars. Note that this post was published before Blogger Beta which is now out of beta and is the New Blogger or just plain Blogger. However, the method should be about the same. If you have a problem, just leave a comment and I will check the post, and if necessary, make a new post.

Thursday, February 14, 2008

Test align left for caption for photos uploaded via Blogger photo upload icon

A blogger at Add caption to images uploaded via the Blogger photo upload icon how to align caption to the left. I have no idea but the only way to know is to test and that is what this blog is for. The result of the first test had been captured in the screenshot below:

screenshot of first test to align caption left

The script used to display the above is shown inside the scroll box below:

<a onblur="try {parent.deselectBloggerImageGracefully();} catch(e) {}" href="https://blogger.googleusercontent.com/img/b/R29vZ2xl/AVvXsEhBpxn_-3TP04MMUkc2FdAm_YOCrF1_JwQIcqKy4NIn8FRCy5Jb9DQtcu_5SDjsKJitIV-5H7is9HwJ7UWBNlzLHjRWN5z7J-vtD5LWG-qWtfTsJmA9euJjWpduWGkTwEZpSJ7I8px8gk_C/s1600-h/Kelana+Jaya+pasar+tani+stalls.JPG"><img style="float:left; margin:0 10px 10px 0;cursor:pointer; cursor:hand;" src="https://blogger.googleusercontent.com/img/b/R29vZ2xl/AVvXsEhBpxn_-3TP04MMUkc2FdAm_YOCrF1_JwQIcqKy4NIn8FRCy5Jb9DQtcu_5SDjsKJitIV-5H7is9HwJ7UWBNlzLHjRWN5z7J-vtD5LWG-qWtfTsJmA9euJjWpduWGkTwEZpSJ7I8px8gk_C/s200/Kelana+Jaya+pasar+tani+stalls.JPG" border="0" alt=""id="BLOGGER_PHOTO_ID_5166982542904398018" />Farmers' Market (Pasar Tani)</a>
<br /><br />
<a onblur="try {parent.deselectBloggerImageGracefully();} catch(e) {}" href="https://blogger.googleusercontent.com/img/b/R29vZ2xl/AVvXsEhBpxn_-3TP04MMUkc2FdAm_YOCrF1_JwQIcqKy4NIn8FRCy5Jb9DQtcu_5SDjsKJitIV-5H7is9HwJ7UWBNlzLHjRWN5z7J-vtD5LWG-qWtfTsJmA9euJjWpduWGkTwEZpSJ7I8px8gk_C/s1600-h/Kelana+Jaya+pasar+tani+stalls.JPG"><img style="float:left; margin:0 10px 10px 0;cursor:pointer; cursor:hand;" src="https://blogger.googleusercontent.com/img/b/R29vZ2xl/AVvXsEhBpxn_-3TP04MMUkc2FdAm_YOCrF1_JwQIcqKy4NIn8FRCy5Jb9DQtcu_5SDjsKJitIV-5H7is9HwJ7UWBNlzLHjRWN5z7J-vtD5LWG-qWtfTsJmA9euJjWpduWGkTwEZpSJ7I8px8gk_C/s200/Kelana+Jaya+pasar+tani+stalls.JPG" border="0" alt=""id="BLOGGER_PHOTO_ID_5166982542904398018" /><span style="text-align:left;">Farmers' Market (Pasar Tani)</span></a>
<br /><br />
<a onblur="try {parent.deselectBloggerImageGracefully();} catch(e) {}" href="https://blogger.googleusercontent.com/img/b/R29vZ2xl/AVvXsEhBpxn_-3TP04MMUkc2FdAm_YOCrF1_JwQIcqKy4NIn8FRCy5Jb9DQtcu_5SDjsKJitIV-5H7is9HwJ7UWBNlzLHjRWN5z7J-vtD5LWG-qWtfTsJmA9euJjWpduWGkTwEZpSJ7I8px8gk_C/s1600-h/Kelana+Jaya+pasar+tani+stalls.JPG"><img style="float:left; margin:0 10px 10px 0;cursor:pointer; cursor:hand;" src="https://blogger.googleusercontent.com/img/b/R29vZ2xl/AVvXsEhBpxn_-3TP04MMUkc2FdAm_YOCrF1_JwQIcqKy4NIn8FRCy5Jb9DQtcu_5SDjsKJitIV-5H7is9HwJ7UWBNlzLHjRWN5z7J-vtD5LWG-qWtfTsJmA9euJjWpduWGkTwEZpSJ7I8px8gk_C/s200/Kelana+Jaya+pasar+tani+stalls.JPG" border="0" alt=""id="BLOGGER_PHOTO_ID_5166982542904398018" /><div style="text-align:left;">Farmers' Market (Pasar Tani)</div></a>


The script above display a screenshot with a border which extend into the left sidebar in some web browsers like the Flock social web browser. The border was removed using method described in Get rid of border in images uploaded via the Blogger photo upload icon (click BACK button to get back to this page)


Even using the HTML tag <br />, could not force the subsequent photo to be displayed to the left except for the third one, and I suspect if I had used a small photo for the test, even that one will not be aligned to the left although all of them have the script to make the image display to the left. Now the other thing to do is to delete the first two script, leaving the third one standing alone below:


Still no luck. That means the method used above cannot be used to align the caption to the left and that means we will have to test other alternatives:


Farmers' Market (Pasar Tani)


This was tough. The above was added first using the tag <div style="text-align:left;">, which in most cases put whatever comes after in a separate line, but that didn't work. So I had to add a <br /> tag to force a line break to make the photo above display in a separate line. Now I also used a HTML table tag <table> to make the caption. Most likely, the first way I used the <table> would end up looking the same as the following more simple method, so I added a border to table by adding a border attribute to the HTML table tag <table border="1">

The script to display the above photo with a caption is shown in the scroll box below:

<br />
<div style="text-align:left;"><table border="1"><tr><td><a onblur="try {parent.deselectBloggerImageGracefully();} catch(e) {}" href="https://blogger.googleusercontent.com/img/b/R29vZ2xl/AVvXsEhBpxn_-3TP04MMUkc2FdAm_YOCrF1_JwQIcqKy4NIn8FRCy5Jb9DQtcu_5SDjsKJitIV-5H7is9HwJ7UWBNlzLHjRWN5z7J-vtD5LWG-qWtfTsJmA9euJjWpduWGkTwEZpSJ7I8px8gk_C/s1600-h/Kelana+Jaya+pasar+tani+stalls.JPG"><img style="float:left; margin:0 10px 10px 0;cursor:pointer; cursor:hand;" src="https://blogger.googleusercontent.com/img/b/R29vZ2xl/AVvXsEhBpxn_-3TP04MMUkc2FdAm_YOCrF1_JwQIcqKy4NIn8FRCy5Jb9DQtcu_5SDjsKJitIV-5H7is9HwJ7UWBNlzLHjRWN5z7J-vtD5LWG-qWtfTsJmA9euJjWpduWGkTwEZpSJ7I8px8gk_C/s200/Kelana+Jaya+pasar+tani+stalls.JPG" border="0" alt=""id="BLOGGER_PHOTO_ID_5166982542904398018" /></a></td></tr><tr><td>Farmers' Market (Pasar Tani)</td></tr></table></div>


Now I am going to try a simpler way without using the table tag <table>


Farmers' Market (Pasar Tani)

Conclusion: I give up. You will have to use the table tag <table>. The above attempted simpler method failed, even after adding a <br /> tag to for a line break, and when that failed, pressing a "ENTER" or "RETURN" key (which has about the same effect as adding a <br /> tag. If you want to use the above simpler method, you will have to keep pressing the "ENTER", previewing, pressing "ENTER" again, etc., until you get the caption below the photo.

Tuesday, February 12, 2008

Monday, February 11, 2008

Link icon in Blogger post editor window: Test

A blogger complaining he is getting text rather than active link in his posts. It was not explained fully, but I am guessing that he is referring to using the link icon Blogger link icon in post editor toolbar in the Blogger post editor window toolbar.

I usually hard code (write the HTML for the hyperlink) rather than use that link icon to make active links, so am not aware of any problems. So I am going to try to make one link active using that link icon while in the EDIT HTML mode:

Blogger FAQ

Tuesday, February 05, 2008

Lengthen Blogger Post Editor Window with Netscape Navigator

Update 2.43am 19 April 2008: Please note that the ability to lengthen the normal pathetically tiny Blogger post editor window is not always repeatable. Sometimes, I can do it, sometimes not. I have seen it a few times but this is the first time I made a post about it with a screen shot and that screen shot is definitely not faked with Adobe Photoshop for this poor Blog*Star only use the free and very good Irfanview plus PC Paint which comes with Windows. This poor Blog*Star cannot afford to buy the expensive Photoshop. Anyone who wants something better than the free Irfanview photo editor can try the open source GIMP. Update posted here to avoid Blog*Star from being called a nut case.


A blogger complained the Blogger Post Editor Window is too small, and I responded that with some browser, couldn't remember which one, I could hover the cursor (mouse) over the bottom of the post editor and pull it down to make it longer. I posted my response and said I will test. I started testing in 6 browsers - Internet Explorer 7.0.5730.131C, FireFox 2.0, Netscape Navigator 9.0.0.5, Flock 1.0.8, Opera 9.25, and Avant 11.5. I couldn't expand the post editor window in all browsers. I had to report failure and that I probably was so obsessed with blogging I even blog while sleeping.

However, I started preparing a post with Netscape one day and found I could do it. You can see a screenshot of this post as I am preparing this post:
Blogger post editor window original
Now see how the Blogger post editor window was expanded (elongated) in the screenshot below:
Blogger post editor window expanded (elongated)
Note that the post editor window is its normal self. Now look at the screenshot below which I saved the other day when I was able to expand (elongate) the post editor window, Note that the cursor had changed from the normal "blank white slanted arrow" cursor to a vertical double arrow head cursor (highlighted by a red ellipse plus a red arrow pointing at it. That was in the first tab of the Netscape browser. I opened another tab in Netscape browser and found that it wasn't possible with that tab.

Today, I am now preparing this post using the Netscape browser and I just could not repeat what I did the other day. I am hoping that visitors to this post will test it in various browsers and report how they fare by leaving a comment. Thanks.