Testing this link to particular methods (spots) in a post about how to recover an accidentally deleted post:
Method 1
Method 2
Showing posts with label testing. Show all posts
Showing posts with label testing. Show all posts
Tuesday, May 14, 2013

Friday, April 12, 2013
Test centering post title & increase font size
Code used:
<span style="text-align:center; font-size:150%;">Test centering post title & increase font size</span>
<span style="text-align:center; font-size:150%;">Test centering post title & increase font size</span>
Monday, March 04, 2013
Friday, March 01, 2013
Test displaying ♠ ♣ ♥ in post title
Test posting HTML codes to display special characters in post title. The HTML codes typed into the post title is as follows:

Now to publish

Now to publish
Monday, July 02, 2012
Testing Blogger custom permalink.
Blogger has now finally introduced the much awaited custom permalink (post URL) to replace the default automatically generated permalink.
This test post title is "Testing Blogger custom permalink" and its automatic URL is
http://testing-blogger-beta.blogspot.com/2012/07/testing-blogger-custom-permalink.html
Now I put in the Custom URL field [box] the following - testingbloggercustompermalink
and this changed the permalink to
http://testing-blogger-beta.blogspot.com/2012/07/bloggercustompermalink.html
It would be nice to have the custom URL as
http://testing-blogger-beta.blogspot.com/bloggercustompermalink.html
instead.
Unfortunately there is no way to remove the year and date of the posting in the URL.
This test post title is "Testing Blogger custom permalink" and its automatic URL is
http://testing-blogger-beta.blogspot.com/2012/07/testing-blogger-custom-permalink.html
Now I put in the Custom URL field [box] the following - testingbloggercustompermalink
and this changed the permalink to
http://testing-blogger-beta.blogspot.com/2012/07/bloggercustompermalink.html
It would be nice to have the custom URL as
http://testing-blogger-beta.blogspot.com/bloggercustompermalink.html
instead.
Unfortunately there is no way to remove the year and date of the posting in the URL.
Thursday, June 17, 2010
Test remove border image old post editor
Testing removing border for a blogger for image uploaded via the old Blogger post editor using instructions from Remove image border for images uploaded via Blogger updated post editor:

HTML to display image above:
HTML to display the photo below is take from How to remove border from images uploaded via the new updated Blogger post editor:

The HTML to display the image below is taken from How to remove border of images uploaded via old Blogger post editor (with HTML below the photo:
![]()
HTML in the scroll box below:

HTML to display image above:
Update: As a result of testing, I have found out that the inline CSS style="border:none;" must be placed before src="photo URL" and not after, preferably immediately after img. The HTML code below will result in image with a border. The image from the photo above is not displaying a border because style="border:none;" was moved. For more details, refer to remove border from photos uploaded via Blogger photo upload icon.
<a onblur="try {parent.deselectBloggerImageGracefully();} catch(e) {}" href="https://blogger.googleusercontent.com/img/b/R29vZ2xl/AVvXsEhPf1NWuRricYl-AtZx13G5DDr6Pk0Yn8c4s7bPdoK-78u5oQu9SBDcPvPfgtPYK1vW3toUh28vfmDrjXFwqv7XVUFf-Wbl87hYl2ihoVN_dcr52ySsgld5iRE2U-EMcP1Kr3gWKQaeI9-P/s1600/_DSC5044.jpg" style="border:none;"><img style="margin: 0px auto 10px; display: block; text-align: center; cursor: pointer; width: 400px; height: 233px;" src="https://blogger.googleusercontent.com/img/b/R29vZ2xl/AVvXsEhPf1NWuRricYl-AtZx13G5DDr6Pk0Yn8c4s7bPdoK-78u5oQu9SBDcPvPfgtPYK1vW3toUh28vfmDrjXFwqv7XVUFf-Wbl87hYl2ihoVN_dcr52ySsgld5iRE2U-EMcP1Kr3gWKQaeI9-P/s400/_DSC5044.jpg" alt="" id="BLOGGER_PHOTO_ID_5481529183870059394" style="border:none;" border="0" /></a>
HTML to display the photo below is take from How to remove border from images uploaded via the new updated Blogger post editor:

<div class="separator" style="clear: both; text-align: center;">
<a href="https://blogger.googleusercontent.com/img/b/R29vZ2xl/AVvXsEiXaOydhZoN32Y3R0hA3c96eGGfR94_vKoalP0LS1rBTq2Y5vOQerKpRnA14AODuwCAPgnnzvbDyM71tTL28n-hUAdYlxItDrPElFbWsGm4YLs0tHBAFrr6pxEJc4opYU7bbR4F3QgU-tg/s1600-h/kimchi.jpg" imageanchor="1" style="margin-left: 1em; margin-right: 1em;"><img style="border:none;" border="0" src="https://blogger.googleusercontent.com/img/b/R29vZ2xl/AVvXsEiXaOydhZoN32Y3R0hA3c96eGGfR94_vKoalP0LS1rBTq2Y5vOQerKpRnA14AODuwCAPgnnzvbDyM71tTL28n-hUAdYlxItDrPElFbWsGm4YLs0tHBAFrr6pxEJc4opYU7bbR4F3QgU-tg/s320/kimchi.jpg" /></a>
</div>
<a href="https://blogger.googleusercontent.com/img/b/R29vZ2xl/AVvXsEiXaOydhZoN32Y3R0hA3c96eGGfR94_vKoalP0LS1rBTq2Y5vOQerKpRnA14AODuwCAPgnnzvbDyM71tTL28n-hUAdYlxItDrPElFbWsGm4YLs0tHBAFrr6pxEJc4opYU7bbR4F3QgU-tg/s1600-h/kimchi.jpg" imageanchor="1" style="margin-left: 1em; margin-right: 1em;"><img style="border:none;" border="0" src="https://blogger.googleusercontent.com/img/b/R29vZ2xl/AVvXsEiXaOydhZoN32Y3R0hA3c96eGGfR94_vKoalP0LS1rBTq2Y5vOQerKpRnA14AODuwCAPgnnzvbDyM71tTL28n-hUAdYlxItDrPElFbWsGm4YLs0tHBAFrr6pxEJc4opYU7bbR4F3QgU-tg/s320/kimchi.jpg" /></a>
</div>
The HTML to display the image below is taken from How to remove border of images uploaded via old Blogger post editor (with HTML below the photo:

HTML in the scroll box below:
<a onblur="try {parent.deselectBloggerImageGracefully();} catch(e) {}" href="http://photos1.blogger.com/x/blogger/1313/787/1600/396073/Sibu%20Island%20-%20Johore%20800x400px.jpg"><img style="border:none;" "display:block; margin:0px auto 10px; text-align:center;cursor:pointer; cursor:hand;" src="http://photos1.blogger.com/x/blogger/1313/787/400/161663/Sibu%20Island%20-%20Johore%20800x400px.jpg" border="0" alt="Sibu Island, Johore 800x400px" /></a>
Saturday, June 05, 2010
Test post title color font type and size
This post is to test if inline CSS can be activated in post title to control the font type, color and size.
Below is what I typed into the post title box:
<span style="color:red; font-family:Reenie Beanie; font-size:140%">Test post title color font type and size</span>
and as you can see from the post title of this post is different from the other posts in this blog. The styling of this post title is controlled by the inline CSS
Note that while font-color and font-size doesn't require extra word, to display the Reenie Beanie font, some code to enable @font-face must be added to the CSS part of the template which has been tested at Test @font-face and inline CSS
Below is what I typed into the post title box:
<span style="color:red; font-family:Reenie Beanie; font-size:140%">Test post title color font type and size</span>
and as you can see from the post title of this post is different from the other posts in this blog. The styling of this post title is controlled by the inline CSS
Note that while font-color and font-size doesn't require extra word, to display the Reenie Beanie font, some code to enable @font-face must be added to the CSS part of the template which has been tested at Test @font-face and inline CSS
πολιτική φιλοσοφία
Now after publishing this post with the post title "politikí̱ filosofía" which is Romanized Greek (greek word using Roman abc alphabets) I will edit the post title to Greek letters πολιτική φιλοσοφία
OK after publication, the permalink (post URL) of this post is
http://testing-blogger-beta.blogspot.com/2010/06/politiki-filosofia.html
unlike when Greek letters πολιτική φιλοσοφία are used for the post title which caused the post title to be the SEO-unfriendly
Greek letters πολιτική φιλοσοφία
OK now I will edit this post and replace with the post title politikí̱ filosofía with Greek letters πολιτική φιλοσοφία and we will then check to reconfirm that there will be no change to the post title which remained the SEO friendly post title like
http://testing-blogger-beta.blogspot.com/2010/06/politiki-filosofia.html
OK after publication, the permalink (post URL) of this post is
http://testing-blogger-beta.blogspot.com/2010/06/politiki-filosofia.html
unlike when Greek letters πολιτική φιλοσοφία are used for the post title which caused the post title to be the SEO-unfriendly
Greek letters πολιτική φιλοσοφία
OK now I will edit this post and replace with the post title politikí̱ filosofía with Greek letters πολιτική φιλοσοφία and we will then check to reconfirm that there will be no change to the post title which remained the SEO friendly post title like
http://testing-blogger-beta.blogspot.com/2010/06/politiki-filosofia.html
Conclusion
Well folks, testing completed and successful. By first using Latin (Roman) alphabets like "politikí̱ filosofía, publishing, then edit the post title to using Greek alphabets like πολιτική φιλοσοφία, one can have the Greek alphabets in the post title and still get SEO friendly post title.Saturday, May 29, 2010
Testing marquee with scrolling pictures
After some initial failed testing, finally succeeded to incorporate horizontal scrolling pictures at Testing Blogger xml templates.
The script used to display those horizontal scrolling graphics is as follows:
<iframe src=" http://site.personnel.free.fr/scroller.htm" height="158" width="100%" scrolling="No" marginheight="0" marginwidth="0" frameborder="0"></iframe>
To do this, it is advisable to first backup whatever page elements (gadgets) that can be backed up and also backup the template so that you can return if anything goes wrong.
Then go to LAYOUT > EDIT HTML to open the template editor and first tick
[ x ] expand widget templates
and search for (make this task easier by keyboard shortcut ctrl+F to find the code):
<div id='header-wrapper'>
and immediately below that line add the iFrame:
<iframe src=" http://site.personnel.free.fr/scroller.htm" height="158" width="100%" scrolling="No" marginheight="0" marginwidth="0" frameborder="0"></iframe>
and thus finally end up with
<div id='header-wrapper'>
<iframe src=" http://site.personnel.free.fr/scroller.htm" height="158" width="100%" scrolling="No" marginheight="0" marginwidth="0" frameborder="0"></iframe>
Preview and if happy, save the template.
Wednesday, October 22, 2008
Third jQuery Expandable Post Summary Test
I have previously tested jQuery Expandable Post Summary at Testing jQuery expandable post summary and Testing jQuery expandable post summary. However, the test was not too satisfactory as I had added too many Gadgets (Page Elements) and the whole posts was initially displayed and only after all the Gadgets have finished downloading was the posts truncated to a short summary ending in a [Read More....] link to display the complete post.
This third test was done on Holidays and Festivals and this time, the test was initially conducted with the blog without any Gadgets. This time the moment the blog was displayed, the jQuery expandable post summary was executed, that is, what was displayed was a short summary of the posts terminated by a [Read More...] link. The Gadgets was added one by one, and each time a Gadget was added, the blog was viewed again. If the posts were truncated to a short summaries, another Gadget was added. This was continued until it was observed that instead of truncated short summaries, the whole post was displayed and jQuery expandable post summary was only executed when all the Gadgets were completely downloaded. When the happened, the last Gadget was deleted. You can check for yourself Holidays and Festivals. You should see short post summaries immediately. If not, please leave a comment and I will look into it.
This third test was done on Holidays and Festivals and this time, the test was initially conducted with the blog without any Gadgets. This time the moment the blog was displayed, the jQuery expandable post summary was executed, that is, what was displayed was a short summary of the posts terminated by a [Read More...] link. The Gadgets was added one by one, and each time a Gadget was added, the blog was viewed again. If the posts were truncated to a short summaries, another Gadget was added. This was continued until it was observed that instead of truncated short summaries, the whole post was displayed and jQuery expandable post summary was only executed when all the Gadgets were completely downloaded. When the happened, the last Gadget was deleted. You can check for yourself Holidays and Festivals. You should see short post summaries immediately. If not, please leave a comment and I will look into it.
Tuesday, October 21, 2008
Test jQuery expandable post summary
What is jQuery?
jQuery is a lightweight JavaScript library that emphasizes interaction between JavaScript and HTML.Why am I testing jQuery?
The previous post on expandable post summary was based on Hackoshpere's hack and require you to do some editing in the post editor to make the expandable post summary works. This hack based on jQuery Expander plugin and Blogger Buster's version only require you to edit the template in 2 steps and do not need you to do anything in the post itself.I tested it on Investment, money and finance but met with the error code "bX-al2pcp". This demonstration blog was created to demonstrate all the various Blogger Gadgets (previously referred to as Page Element) and this may be causing the problem. I then tested it on Career and you while it was still using the 3 column Minima template with very few Gadgets and was successful.
I want to do some troubleshooting and try to trace what may be the problem with implementing it on Investment, money and finance and installed the same 4 column Minima template (this will remove the jQuery expander plugin) and installed the same gadgets. I further voted on the poll plus followed the blog just like in Investment, money and finance. I then proceeded to reimplement the jQuery expandable post summary. To my surprise, there were no error code and the jQuery expandable post summary was implemented without problem. So I was unable to troubleshoot why I was unable to implement jQuery expandable post summary for Investment, money and finance.
There was one thing I could try, that is, delete all the Gadgets from the blog like the way I solve the Error code bX-jdokxi, but since it was a demonstration blog, I decided to leave it alone. However, if you face a similar problem, perhaps you can follow the methods as in solve the Error code bX-jdokxi. If you do, I hope you will give us feedback on your progress.
In the meantime, I will later write a post on some slight variation on Blogger Buster's jQuery expandable post summary
Friday, September 26, 2008
Test <em> HTML tag in place of scroll box
Update 5.49pm: I misunderstood the commentator's intention as he only gave a link to encode HTML entities without any explanation. Turned out that the link is to a tool which will automatically encode and decode HTML entities.
A commentator commented that surrounding HTML code with <em> </em> tags
displaying HTML codes in scroll box. <em> is for putting emphasis on text and I am going to test surrounding a very long HTML document (4 column Minima template) with <em> </em> tags and see how it turns out:
<?xml version="1.0" encoding="UTF-8" ?>
<!DOCTYPE html PUBLIC "-//W3C//DTD XHTML 1.0 Strict//EN" "http://www.w3.org/TR/xhtml1/DTD/xhtml1-strict.dtd">
<html expr:dir='data:blog.languageDirection' xmlns='http://www.w3.org/1999/xhtml' xmlns:b='http://www.google.com/2005/gml/b' xmlns:data='http://www.google.com/2005/gml/data' xmlns:expr='http://www.google.com/2005/gml/expr'>
<head>
<b:include data='blog' name='all-head-content'/>
<title><data:blog.pageTitle/></title>
<b:skin><![CDATA[/*
-----------------------------------------------
Blogger Template Style
Name: Minima
Designer: Douglas Bowman
URL: www.stopdesign.com
Modified by Peter Chen
URL: blogger-tricks.blogspot.com
Date: 26 Feb 2004
Updated by: Blogger Team
----------------------------------------------- */
/* Variable definitions
====================
<Variable name="bgcolor" description="Page Background Color"
type="color" default="#fff" value="#ffffff">
<Variable name="textcolor" description="Text Color"
type="color" default="#333" value="#333333">
<Variable name="linkcolor" description="Link Color"
type="color" default="#58a" value="#5588aa">
<Variable name="pagetitlecolor" description="Blog Title Color"
type="color" default="#666" value="#666666">
<Variable name="descriptioncolor" description="Blog Description Color"
type="color" default="#999" value="#999999">
<Variable name="titlecolor" description="Post Title Color"
type="color" default="#c60" value="#cc6600">
<Variable name="bordercolor" description="Border Color"
type="color" default="#ccc" value="#cccccc">
<Variable name="sidebarcolor" description="Sidebar Title Color"
type="color" default="#999" value="#999999">
<Variable name="sidebartextcolor" description="Sidebar Text Color"
type="color" default="#666" value="#666666">
<Variable name="visitedlinkcolor" description="Visited Link Color"
type="color" default="#999" value="#999999">
<Variable name="bodyfont" description="Text Font"
type="font" default="normal normal 100% Georgia, Serif" value="normal normal 100% Georgia, Serif">
<Variable name="headerfont" description="Sidebar Title Font"
type="font"
default="normal normal 78% 'Trebuchet MS',Trebuchet,Arial,Verdana,Sans-serif" value="normal normal 78% 'Trebuchet MS',Trebuchet,Arial,Verdana,Sans-serif">
<Variable name="pagetitlefont" description="Blog Title Font"
type="font"
default="normal normal 200% Georgia, Serif" value="normal normal 200% Georgia, Serif">
<Variable name="descriptionfont" description="Blog Description Font"
type="font"
default="normal normal 78% 'Trebuchet MS', Trebuchet, Arial, Verdana, Sans-serif" value="normal normal 78% 'Trebuchet MS', Trebuchet, Arial, Verdana, Sans-serif">
<Variable name="postfooterfont" description="Post Footer Font"
type="font"
default="normal normal 78% 'Trebuchet MS', Trebuchet, Arial, Verdana, Sans-serif" value="normal normal 78% 'Trebuchet MS', Trebuchet, Arial, Verdana, Sans-serif">
<Variable name="startSide" description="Side where text starts in blog language"
type="automatic" default="left" value="left">
<Variable name="endSide" description="Side where text ends in blog language"
type="automatic" default="right" value="right">
*/
/* Use this with templates/template-twocol.html */
body {
background:$bgcolor;
margin:0;
color:$textcolor;
font:x-small Georgia Serif;
font-size/* */:/**/small;
font-size: /**/small;
text-align: center;
}
a:link {
color:$linkcolor;
text-decoration:none;
}
a:visited {
color:$visitedlinkcolor;
text-decoration:none;
}
a:hover {
color:$titlecolor;
text-decoration:underline;
}
a img {
border-width:0;
}
/* Header
-----------------------------------------------
*/
#header-wrapper {
width:100%;
margin:0 auto 10px;
border:1px solid $bordercolor;
}
#header-inner {
background-position: center;
margin-left: auto;
margin-right: auto;
}
#header {
margin: 5px;
border: 1px solid $bordercolor;
text-align: center;
color:$pagetitlecolor;
}
#header h1 {
margin:5px 5px 0;
padding:15px 20px .25em;
line-height:1.2em;
text-transform:uppercase;
letter-spacing:.2em;
font: $pagetitlefont;
}
#header a {
color:$pagetitlecolor;
text-decoration:none;
}
#header a:hover {
color:$pagetitlecolor;
}
#header .description {
margin:0 5px 5px;
padding:0 20px 15px;
max-width:950px;
text-transform:uppercase;
letter-spacing:.2em;
line-height: 1.4em;
font: $descriptionfont;
color: $descriptioncolor;
text-align: center;
}
#header img {
margin-$startSide: auto;
margin-$endSide: auto;
}
/* Outer-Wrapper
----------------------------------------------- */
#outer-wrapper {
width: 990px;
margin:0 auto;
padding:0;
text-align:left;
font: $bodyfont;
}
#main-wrapper {
margin:0 0 0 20px;
width: 450px;
float: left;
word-wrap: break-word; /* fix for long text breaking sidebar float in IE */
overflow: hidden; /* fix for long non-text content breaking IE sidebar float */
}
#left-column {
width: 163px;
float: left;
word-wrap: break-word; /* fix for long text breaking sidebar float in IE */
overflow: hidden; /* fix for long non-text content breaking IE sidebar float */
}
#rightsidebar-left {
margin:0 0 0 10px;
width: 163px;
float: left;
word-wrap: break-word;
overflow: hidden;
}
#rightsidebar-right {
width: 164px;
float: right;
word-wrap: break-word;
overflow: hidden;
}
/* Headings
----------------------------------------------- */
h2 {
margin:1.5em 0 .75em;
font:$headerfont;
line-height: 1.4em;
text-transform:uppercase;
letter-spacing:.2em;
color:$sidebarcolor;
}
/* Posts
-----------------------------------------------
*/
h2.date-header {
margin:1.5em 0 .5em;
}
.post {
margin:.5em 0 1.5em;
border-bottom:1px dotted $bordercolor;
padding-bottom:1.5em;
}
.post h3 {
margin:.25em 0 0;
padding:0 0 4px;
font-size:140%;
font-weight:normal;
line-height:1.4em;
color:$titlecolor;
}
.post h3 a, .post h3 a:visited, .post h3 strong {
display:block;
text-decoration:none;
color:$titlecolor;
font-weight:normal;
}
.post h3 strong, .post h3 a:hover {
color:$textcolor;
}
.post-body {
margin:0 0 .75em;
line-height:1.6em;
}
.post-body blockquote {
line-height:1.3em;
}
.post-footer {
margin: .75em 0;
color:$sidebarcolor;
text-transform:uppercase;
letter-spacing:.1em;
font: $postfooterfont;
line-height: 1.4em;
}
.comment-link {
margin-$startSide:.6em;
}
.post img {
padding:4px;
border:1px solid $bordercolor;
}
.post blockquote {
margin:1em 20px;
}
.post blockquote p {
margin:.75em 0;
}
/* Comments
----------------------------------------------- */
#comments h4 {
margin:1em 0;
font-weight: bold;
line-height: 1.4em;
text-transform:uppercase;
letter-spacing:.2em;
color: $sidebarcolor;
}
#comments-block {
margin:1em 0 1.5em;
line-height:1.6em;
}
#comments-block .comment-author {
margin:.5em 0;
}
#comments-block .comment-body {
margin:.25em 0 0;
}
#comments-block .comment-footer {
margin:-.25em 0 2em;
line-height: 1.4em;
text-transform:uppercase;
letter-spacing:.1em;
}
#comments-block .comment-body p {
margin:0 0 .75em;
}
.deleted-comment {
font-style:italic;
color:gray;
}
#blog-pager-newer-link {
float: $startSide;
}
#blog-pager-older-link {
float: $endSide;
}
#blog-pager {
text-align: center;
}
.feed-links {
clear: both;
line-height: 2.5em;
}
/* Sidebar Content
----------------------------------------------- */
.sidebar {
color: $sidebartextcolor;
line-height: 1.5em;
}
.sidebar ul {
list-style:none;
margin:0 0 0;
padding:0 0 0;
}
.sidebar li {
margin:0;
padding-top:0;
padding-$endSide:0;
padding-bottom:.25em;
padding-$startSide:15px;
text-indent:-15px;
line-height:1.5em;
}
.sidebar .widget, .main .widget {
border-bottom:1px dotted $bordercolor;
margin:0 0 1.5em;
padding:0 0 1.5em;
}
.main .Blog {
border-bottom-width: 0;
}
/* Profile
----------------------------------------------- */
.profile-img {
float: $startSide;
margin-top: 0;
margin-$endSide: 5px;
margin-bottom: 5px;
margin-$startSide: 0;
padding: 4px;
border: 1px solid $bordercolor;
}
.profile-data {
margin:0;
text-transform:uppercase;
letter-spacing:.1em;
font: $postfooterfont;
color: $sidebarcolor;
font-weight: bold;
line-height: 1.6em;
}
.profile-datablock {
margin:.5em 0 .5em;
}
.profile-textblock {
margin: 0.5em 0;
line-height: 1.6em;
}
.profile-link {
font: $postfooterfont;
text-transform: uppercase;
letter-spacing: .1em;
}
/* Footer
----------------------------------------------- */
#footer {
width:990px;
clear:both;
margin:0 auto;
padding-top:15px;
line-height: 1.6em;
text-transform:uppercase;
letter-spacing:.1em;
text-align: center;
}
]]></b:skin>
</head>
<body>
<div id='outer-wrapper'><div id='wrap2'>
<!-- skip links for text browsers -->
<span id='skiplinks' style='display:none;'>
<a href='#main'>skip to main </a> |
<a href='#sidebar'>skip to sidebar</a>
</span>
<div id='header-wrapper'>
<b:section class='header' id='header' maxwidgets='' showaddelement='yes'>
<b:widget id='Header1' locked='true' title='4 column blog (Header)' type='Header'/>
</b:section>
</div>
<div id='content-wrapper'>
<div id='crosscol-wrapper' style='text-align:center'>
<b:section class='crosscol' id='crosscol' showaddelement='yes'>
<b:widget id='HTML2' locked='false' title='' type='HTML'/>
</b:section>
</div>
<div id='left-column'>
<b:section class='sidebar' id='sidebar' preferred='yes'>
<b:widget id='BlogArchive1' locked='false' title='Blog Archive' type='BlogArchive'/>
</b:section>
</div>
<div id='main-wrapper'>
<b:section class='main' id='main' showaddelement='yes'>
<b:widget id='Blog1' locked='true' title='Blog Posts' type='Blog'/>
</b:section>
</div>
<div id='rightsidebar-left'>
<b:section class='sidebar' id='sidebar2' preferred='yes'/>
</div>
<div id='rightsidebar-right'>
<b:section class='sidebar' id='sidebar3' preferred='yes'>
<b:widget id='HTML1' locked='false' title='' type='HTML'/>
</b:section>
</div>
<!-- spacer for skins that want sidebar and main to be the same height-->
<div class='clear'> </div>
</div> <!-- end content-wrapper -->
<div id='footer-wrapper'>
<b:section class='footer' id='footer'/>
</div>
</div></div> <!-- end outer-wrapper -->
</body>
</html>
As expected, the codes ended up (almost) one mile long. Compare it with using a scroll box:
<?xml version="1.0" encoding="UTF-8" ?>
<!DOCTYPE html PUBLIC "-//W3C//DTD XHTML 1.0 Strict//EN" "http://www.w3.org/TR/xhtml1/DTD/xhtml1-strict.dtd">
<html expr:dir='data:blog.languageDirection' xmlns='http://www.w3.org/1999/xhtml' xmlns:b='http://www.google.com/2005/gml/b' xmlns:data='http://www.google.com/2005/gml/data' xmlns:expr='http://www.google.com/2005/gml/expr'>
<head>
<b:include data='blog' name='all-head-content'/>
<title><data:blog.pageTitle/></title>
<b:skin><![CDATA[/*
-----------------------------------------------
Blogger Template Style
Name: Minima
Designer: Douglas Bowman
URL: www.stopdesign.com
Modified by Peter Chen
URL: blogger-tricks.blogspot.com
Date: 26 Feb 2004
Updated by: Blogger Team
----------------------------------------------- */
/* Variable definitions
====================
<Variable name="bgcolor" description="Page Background Color"
type="color" default="#fff" value="#ffffff">
<Variable name="textcolor" description="Text Color"
type="color" default="#333" value="#333333">
<Variable name="linkcolor" description="Link Color"
type="color" default="#58a" value="#5588aa">
<Variable name="pagetitlecolor" description="Blog Title Color"
type="color" default="#666" value="#666666">
<Variable name="descriptioncolor" description="Blog Description Color"
type="color" default="#999" value="#999999">
<Variable name="titlecolor" description="Post Title Color"
type="color" default="#c60" value="#cc6600">
<Variable name="bordercolor" description="Border Color"
type="color" default="#ccc" value="#cccccc">
<Variable name="sidebarcolor" description="Sidebar Title Color"
type="color" default="#999" value="#999999">
<Variable name="sidebartextcolor" description="Sidebar Text Color"
type="color" default="#666" value="#666666">
<Variable name="visitedlinkcolor" description="Visited Link Color"
type="color" default="#999" value="#999999">
<Variable name="bodyfont" description="Text Font"
type="font" default="normal normal 100% Georgia, Serif" value="normal normal 100% Georgia, Serif">
<Variable name="headerfont" description="Sidebar Title Font"
type="font"
default="normal normal 78% 'Trebuchet MS',Trebuchet,Arial,Verdana,Sans-serif" value="normal normal 78% 'Trebuchet MS',Trebuchet,Arial,Verdana,Sans-serif">
<Variable name="pagetitlefont" description="Blog Title Font"
type="font"
default="normal normal 200% Georgia, Serif" value="normal normal 200% Georgia, Serif">
<Variable name="descriptionfont" description="Blog Description Font"
type="font"
default="normal normal 78% 'Trebuchet MS', Trebuchet, Arial, Verdana, Sans-serif" value="normal normal 78% 'Trebuchet MS', Trebuchet, Arial, Verdana, Sans-serif">
<Variable name="postfooterfont" description="Post Footer Font"
type="font"
default="normal normal 78% 'Trebuchet MS', Trebuchet, Arial, Verdana, Sans-serif" value="normal normal 78% 'Trebuchet MS', Trebuchet, Arial, Verdana, Sans-serif">
<Variable name="startSide" description="Side where text starts in blog language"
type="automatic" default="left" value="left">
<Variable name="endSide" description="Side where text ends in blog language"
type="automatic" default="right" value="right">
*/
/* Use this with templates/template-twocol.html */
body {
background:$bgcolor;
margin:0;
color:$textcolor;
font:x-small Georgia Serif;
font-size/* */:/**/small;
font-size: /**/small;
text-align: center;
}
a:link {
color:$linkcolor;
text-decoration:none;
}
a:visited {
color:$visitedlinkcolor;
text-decoration:none;
}
a:hover {
color:$titlecolor;
text-decoration:underline;
}
a img {
border-width:0;
}
/* Header
-----------------------------------------------
*/
#header-wrapper {
width:100%;
margin:0 auto 10px;
border:1px solid $bordercolor;
}
#header-inner {
background-position: center;
margin-left: auto;
margin-right: auto;
}
#header {
margin: 5px;
border: 1px solid $bordercolor;
text-align: center;
color:$pagetitlecolor;
}
#header h1 {
margin:5px 5px 0;
padding:15px 20px .25em;
line-height:1.2em;
text-transform:uppercase;
letter-spacing:.2em;
font: $pagetitlefont;
}
#header a {
color:$pagetitlecolor;
text-decoration:none;
}
#header a:hover {
color:$pagetitlecolor;
}
#header .description {
margin:0 5px 5px;
padding:0 20px 15px;
max-width:950px;
text-transform:uppercase;
letter-spacing:.2em;
line-height: 1.4em;
font: $descriptionfont;
color: $descriptioncolor;
text-align: center;
}
#header img {
margin-$startSide: auto;
margin-$endSide: auto;
}
/* Outer-Wrapper
----------------------------------------------- */
#outer-wrapper {
width: 990px;
margin:0 auto;
padding:0;
text-align:left;
font: $bodyfont;
}
#main-wrapper {
margin:0 0 0 20px;
width: 450px;
float: left;
word-wrap: break-word; /* fix for long text breaking sidebar float in IE */
overflow: hidden; /* fix for long non-text content breaking IE sidebar float */
}
#left-column {
width: 163px;
float: left;
word-wrap: break-word; /* fix for long text breaking sidebar float in IE */
overflow: hidden; /* fix for long non-text content breaking IE sidebar float */
}
#rightsidebar-left {
margin:0 0 0 10px;
width: 163px;
float: left;
word-wrap: break-word;
overflow: hidden;
}
#rightsidebar-right {
width: 164px;
float: right;
word-wrap: break-word;
overflow: hidden;
}
/* Headings
----------------------------------------------- */
h2 {
margin:1.5em 0 .75em;
font:$headerfont;
line-height: 1.4em;
text-transform:uppercase;
letter-spacing:.2em;
color:$sidebarcolor;
}
/* Posts
-----------------------------------------------
*/
h2.date-header {
margin:1.5em 0 .5em;
}
.post {
margin:.5em 0 1.5em;
border-bottom:1px dotted $bordercolor;
padding-bottom:1.5em;
}
.post h3 {
margin:.25em 0 0;
padding:0 0 4px;
font-size:140%;
font-weight:normal;
line-height:1.4em;
color:$titlecolor;
}
.post h3 a, .post h3 a:visited, .post h3 strong {
display:block;
text-decoration:none;
color:$titlecolor;
font-weight:normal;
}
.post h3 strong, .post h3 a:hover {
color:$textcolor;
}
.post-body {
margin:0 0 .75em;
line-height:1.6em;
}
.post-body blockquote {
line-height:1.3em;
}
.post-footer {
margin: .75em 0;
color:$sidebarcolor;
text-transform:uppercase;
letter-spacing:.1em;
font: $postfooterfont;
line-height: 1.4em;
}
.comment-link {
margin-$startSide:.6em;
}
.post img {
padding:4px;
border:1px solid $bordercolor;
}
.post blockquote {
margin:1em 20px;
}
.post blockquote p {
margin:.75em 0;
}
/* Comments
----------------------------------------------- */
#comments h4 {
margin:1em 0;
font-weight: bold;
line-height: 1.4em;
text-transform:uppercase;
letter-spacing:.2em;
color: $sidebarcolor;
}
#comments-block {
margin:1em 0 1.5em;
line-height:1.6em;
}
#comments-block .comment-author {
margin:.5em 0;
}
#comments-block .comment-body {
margin:.25em 0 0;
}
#comments-block .comment-footer {
margin:-.25em 0 2em;
line-height: 1.4em;
text-transform:uppercase;
letter-spacing:.1em;
}
#comments-block .comment-body p {
margin:0 0 .75em;
}
.deleted-comment {
font-style:italic;
color:gray;
}
#blog-pager-newer-link {
float: $startSide;
}
#blog-pager-older-link {
float: $endSide;
}
#blog-pager {
text-align: center;
}
.feed-links {
clear: both;
line-height: 2.5em;
}
/* Sidebar Content
----------------------------------------------- */
.sidebar {
color: $sidebartextcolor;
line-height: 1.5em;
}
.sidebar ul {
list-style:none;
margin:0 0 0;
padding:0 0 0;
}
.sidebar li {
margin:0;
padding-top:0;
padding-$endSide:0;
padding-bottom:.25em;
padding-$startSide:15px;
text-indent:-15px;
line-height:1.5em;
}
.sidebar .widget, .main .widget {
border-bottom:1px dotted $bordercolor;
margin:0 0 1.5em;
padding:0 0 1.5em;
}
.main .Blog {
border-bottom-width: 0;
}
/* Profile
----------------------------------------------- */
.profile-img {
float: $startSide;
margin-top: 0;
margin-$endSide: 5px;
margin-bottom: 5px;
margin-$startSide: 0;
padding: 4px;
border: 1px solid $bordercolor;
}
.profile-data {
margin:0;
text-transform:uppercase;
letter-spacing:.1em;
font: $postfooterfont;
color: $sidebarcolor;
font-weight: bold;
line-height: 1.6em;
}
.profile-datablock {
margin:.5em 0 .5em;
}
.profile-textblock {
margin: 0.5em 0;
line-height: 1.6em;
}
.profile-link {
font: $postfooterfont;
text-transform: uppercase;
letter-spacing: .1em;
}
/* Footer
----------------------------------------------- */
#footer {
width:990px;
clear:both;
margin:0 auto;
padding-top:15px;
line-height: 1.6em;
text-transform:uppercase;
letter-spacing:.1em;
text-align: center;
}
]]></b:skin>
</head>
<body>
<div id='outer-wrapper'><div id='wrap2'>
<!-- skip links for text browsers -->
<span id='skiplinks' style='display:none;'>
<a href='#main'>skip to main </a> |
<a href='#sidebar'>skip to sidebar</a>
</span>
<div id='header-wrapper'>
<b:section class='header' id='header' maxwidgets='' showaddelement='yes'>
<b:widget id='Header1' locked='true' title='4 column blog (Header)' type='Header'/>
</b:section>
</div>
<div id='content-wrapper'>
<div id='crosscol-wrapper' style='text-align:center'>
<b:section class='crosscol' id='crosscol' showaddelement='yes'>
<b:widget id='HTML2' locked='false' title='' type='HTML'/>
</b:section>
</div>
<div id='left-column'>
<b:section class='sidebar' id='sidebar' preferred='yes'>
<b:widget id='BlogArchive1' locked='false' title='Blog Archive' type='BlogArchive'/>
</b:section>
</div>
<div id='main-wrapper'>
<b:section class='main' id='main' showaddelement='yes'>
<b:widget id='Blog1' locked='true' title='Blog Posts' type='Blog'/>
</b:section>
</div>
<div id='rightsidebar-left'>
<b:section class='sidebar' id='sidebar2' preferred='yes'/>
</div>
<div id='rightsidebar-right'>
<b:section class='sidebar' id='sidebar3' preferred='yes'>
<b:widget id='HTML1' locked='false' title='' type='HTML'/>
</b:section>
</div>
<!-- spacer for skins that want sidebar and main to be the same height-->
<div class='clear'> </div>
</div> <!-- end content-wrapper -->
<div id='footer-wrapper'>
<b:section class='footer' id='footer'/>
</div>
</div></div> <!-- end outer-wrapper -->
</body>
</html>
Saturday, June 30, 2007
Embedding Imeen playlist using the embed script
In the previous test, I had used the "Blog this" section to get the playlist into the post. For this I had to give access to www.imeen.com access to my Blogger account and got a security warning message. I checked Imeen site again and notice under the "Add to my:" section, there is a script for pasting into the post editor window, which means I don't need to give access to www.imeen.com. I put the script into the scroll box for you to see how the script look like to embed the playlist below:
<object width="300" height="290"><param name="movie" value="http://media.imeem.com/pl/-IutYgTin6/aus=false/"></param><param name="wmode" value="transparent"></param><embed src="http://media.imeem.com/pl/-IutYgTin6/aus=false/" type="application/x-shockwave-flash" width="300" height="290" wmode="transparent"></embed></object>
Thursday, June 28, 2007
Testing another way of avoiding large white space above tables in Blogger
I have previously posted about How to avoid large white space above tables in Blogger.
Got some information from one of my blog reader about another way to do it, so will test it here to see if it works:
This is the first table I am using for the test. The "data" in the table are actually hyperlinks.
Update: As you can see, there are not large white space above the table.
For instructions how to do this, see Avoiding large spaces above tables in Blogger posts Part 2
Got some information from one of my blog reader about another way to do it, so will test it here to see if it works:
First table
This is the first table I am using for the test. The "data" in the table are actually hyperlinks.
| My First Blogger blog | My Second Blogger blog | My Third Blogger blog testing |
| Blogger for Dummies | Blogger Tips and Tricks | Dummies Guide to Google Blogger |
Second table
| Heading 1 | Heading 2 | Heading 3 |
| row 1 col 1 | row 1 col 2 | row 1 col 3 |
| row 2 col 1 | row 2 col 2 | row 2 col 3 |
Update: As you can see, there are not large white space above the table.
For instructions how to do this, see Avoiding large spaces above tables in Blogger posts Part 2
Saturday, June 23, 2007
Recent comments widget creator
There are frequent request to put "Recent comments" in the blog sidebar. Beautiful Beta Widget Installation and Downloads Page has provided a way for installing such a widget. If you scroll just a bit down the page, you will see a section "Recent comments widget".
I have tested the widget for the blog Blogging Ideas and found that it worked well. You can see it toward the bottom of the left sidebar.
To install the recent comments widget, click on "Add Recent Comments to Blog" and you will get to a configuration page:
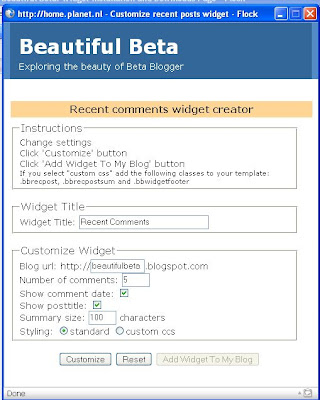
As you can see from the screenshot, you will be required to replace the "beautifulbeta" part of the blog URL and replace it with the blog you intend to install the widget in. However, I really don't see the need for this, for later, you will be required to chose the blog you want the widget to be installed in again. You may change the widget title from the default "Recent comments" to something else and to change the other default setting if you want. When you are finished, just click "Customize" and the "Add Widget to my Blog" will be activated. Click on that, and if you happened to be already signed into your Blogger account, you will be taken to Blogger page "Add Page Element" where there is a drop-down menu to chose the blog you want to install the widget in. Do that, then click "Add widget" and the widget will be added to the top of the first instance of the sections of the Layout, which in my case was the top of the left sidebar. I didn't want it there, so I dragged it to the bottom of the left sidebar and click "Save" at the top right of the Layout. You can see the result at Blogging Ideas.
I have tested the widget for the blog Blogging Ideas and found that it worked well. You can see it toward the bottom of the left sidebar.
To install the recent comments widget, click on "Add Recent Comments to Blog" and you will get to a configuration page:

As you can see from the screenshot, you will be required to replace the "beautifulbeta" part of the blog URL and replace it with the blog you intend to install the widget in. However, I really don't see the need for this, for later, you will be required to chose the blog you want the widget to be installed in again. You may change the widget title from the default "Recent comments" to something else and to change the other default setting if you want. When you are finished, just click "Customize" and the "Add Widget to my Blog" will be activated. Click on that, and if you happened to be already signed into your Blogger account, you will be taken to Blogger page "Add Page Element" where there is a drop-down menu to chose the blog you want to install the widget in. Do that, then click "Add widget" and the widget will be added to the top of the first instance of the sections of the Layout, which in my case was the top of the left sidebar. I didn't want it there, so I dragged it to the bottom of the left sidebar and click "Save" at the top right of the Layout. You can see the result at Blogging Ideas.
Friday, June 22, 2007
Testing ClickComments
Came across this site that describe a common problem for blogs - reluctance of visitors to leave a comment and offer a kind of solution to it. Some of the reasons are they don't like to give their email address, they are too lazy to type a sentence or two (or even a word or two), etc. What they offer is to enable the visitor to just click from a choice of icons to express what is their feeling or opinion of the post.
ClickComments enable you in just a few steps to install a row of icons that your blog visitors can click to express what they feel or think about the post. This row of clickable icons will show above and in addition to your normal Blogger comment. To see an example, surf over to Good Health Information. You will see the row of clickable icons at the bottom of the post, above the normal Blogger comment. Hover your mouse over an icon and a "pop-up" will tell you what the icon is for, and if that express your feeling or opinion, click on it and the number below the icon will increase by one.
In addition to allowing your visitors to sort of "vote" for your post, you may also get extra traffic as your blog will appear in the list of blogs in the "Showcase" in ClickComment's site.
Getting ClickComment is easy. You don't even need to sign up. All you need to do is to give your blog URL, select a category and the language, provide your email address (optional).

I am wondering what exactly is the purpose of providing your blog URL because if you happened to be signed into your Blogger account, when you click "Get ClickComments", you will be taken to the Blogger page where you will again have to select your blog, which seem to me that you can chose a blog different from the blog URL you provided earlier.

ClickComments enable you in just a few steps to install a row of icons that your blog visitors can click to express what they feel or think about the post. This row of clickable icons will show above and in addition to your normal Blogger comment. To see an example, surf over to Good Health Information. You will see the row of clickable icons at the bottom of the post, above the normal Blogger comment. Hover your mouse over an icon and a "pop-up" will tell you what the icon is for, and if that express your feeling or opinion, click on it and the number below the icon will increase by one.
In addition to allowing your visitors to sort of "vote" for your post, you may also get extra traffic as your blog will appear in the list of blogs in the "Showcase" in ClickComment's site.
Getting ClickComment is easy. You don't even need to sign up. All you need to do is to give your blog URL, select a category and the language, provide your email address (optional).

I am wondering what exactly is the purpose of providing your blog URL because if you happened to be signed into your Blogger account, when you click "Get ClickComments", you will be taken to the Blogger page where you will again have to select your blog, which seem to me that you can chose a blog different from the blog URL you provided earlier.

Thursday, June 21, 2007
Testing Autosave
New Blogger recently imposed Autosave on bloggers using Google Blogger. Now Blogger automatically save a post you are preparing without you having to click "Save as draft". There were a number of problems, some of which were eventually ironed out. There are still some who are not happy about Autosave, including me who are pleading with Blogger to give us the option to turn Autosave off.
A blogger in the Google Blogger Help group recently gave the reason why he don't want the Autosave. He says he like to edit his old posts, play around it, rearrange it, etc. Previously, if he don't like the alterations, he just don't publish the post. Now whatever changes he makes to the old post get autosaved and overwrite his original post irrespective of whether he likes it or not. This to me is a very good reason why Blogger should give us the option to turn Autosave off. I have been given to understand that this has been conveyed to the Blogger team, but it is unlikely they are going to act on it.
Another thing I would like to know. What if we are editing a previously published post, and the post got autosaved. Will it be saved as a draft without us knowing? This is what I am going to test in this post. I am going to publish it, then edit it and leave the post editor window opened for some time and see what happens. Here goes.
Update 6.30pm 22 June 2007 GMT +8: I am now editing this post. I will leave it for a while (for quite a while just to make sure).
Update 9.30pm 22 June 2007 GMT +8: I have observed when preparing posts that after a while, a message "Autosaved at ...." appears to the right of the "Save as draft" button in the post editor page. However, up till now, I still see no such message:

I also right-click the "EDIT POSTS" tabs to get to the list of posts, and saw this post as still published, not saved as draft.

I am going to sleep and leave this post editor window opened till next morning to see if there is any change.
Update 4.59am GMT +8 23 June 2007. I still don't see the " autosaved at ..." message. Further, which I rigth-click on EDIT POSTS and chose "open in new tab", I see the post as published and not saved as draft. Further, when I right-click on VIEW BLOG, I saw that the passage "I am going to sleep and leave this post editor window opened till next morning to see if there is any change" was not published. Either Autosave is not working for this blog or there is something I do not know.
Update 11 July 2007: The parargraphs in the post editor are still nicely separated by line breaks with no <br /> tags in sight. So I really don't know when Blogger will leave your post (in EDIT HTML mode) in the post editor window alone, and when it will jumble it up into a whole "paragraphs" with <br /> to separate the paragraphs when displayed on the web. This will probably be the last time I check the post.
Conclusion: test inconclusive. Time permitting, I will try the same test in another Blogger account.
A blogger in the Google Blogger Help group recently gave the reason why he don't want the Autosave. He says he like to edit his old posts, play around it, rearrange it, etc. Previously, if he don't like the alterations, he just don't publish the post. Now whatever changes he makes to the old post get autosaved and overwrite his original post irrespective of whether he likes it or not. This to me is a very good reason why Blogger should give us the option to turn Autosave off. I have been given to understand that this has been conveyed to the Blogger team, but it is unlikely they are going to act on it.
Another thing I would like to know. What if we are editing a previously published post, and the post got autosaved. Will it be saved as a draft without us knowing? This is what I am going to test in this post. I am going to publish it, then edit it and leave the post editor window opened for some time and see what happens. Here goes.
Update 6.30pm 22 June 2007 GMT +8: I am now editing this post. I will leave it for a while (for quite a while just to make sure).
Update 9.30pm 22 June 2007 GMT +8: I have observed when preparing posts that after a while, a message "Autosaved at ...." appears to the right of the "Save as draft" button in the post editor page. However, up till now, I still see no such message:

I also right-click the "EDIT POSTS" tabs to get to the list of posts, and saw this post as still published, not saved as draft.

I am going to sleep and leave this post editor window opened till next morning to see if there is any change.
Update 4.59am GMT +8 23 June 2007. I still don't see the " autosaved at ..." message. Further, which I rigth-click on EDIT POSTS and chose "open in new tab", I see the post as published and not saved as draft. Further, when I right-click on VIEW BLOG, I saw that the passage "I am going to sleep and leave this post editor window opened till next morning to see if there is any change" was not published. Either Autosave is not working for this blog or there is something I do not know.
Update 11 July 2007: The parargraphs in the post editor are still nicely separated by line breaks with no <br /> tags in sight. So I really don't know when Blogger will leave your post (in EDIT HTML mode) in the post editor window alone, and when it will jumble it up into a whole "paragraphs" with <br /> to separate the paragraphs when displayed on the web. This will probably be the last time I check the post.
Conclusion: test inconclusive. Time permitting, I will try the same test in another Blogger account.
Friday, June 15, 2007
iContact for your blog, especially business blogs
Blogger do not have provision for scheduling post to be published at future dates. You can click "Post Options" at the bottom left of the post editor and change the date to a future date. But when you publish it, it will be published immediately, just with the post dated at a future date.
I previously published a post for a work-around: Prepare post to be published in the future. Unfortunately the site that enable this work-around is no longer online. The domain was not renewed. The creator probably found his venture not viable as a free service.
UPDATE November 3 2007: Forgot to mention this post: Scheduling future posts using Time Cave (click BACK button to get back to this page).
Here is a possible alternative - iContact. iContact is an email marketing and blogging tool that makes it easy for people to create, publish, and track email newsletters, blogs, RSS feeds, surveys, and autoresponders. With the autoresponder, you can prepare messages to be sent to subscribers according to, say, 3 day, 1 week, 2 weeks, etc, from the date they subscribed.
I have examined the features available in iContact, and one thing that attracted me was the possibility to schedule messages to be sent in a future date. This feature can be used in the same way to schedule post to be published to Blogger as described in Prepare post to be published in the future. I have prepared a post, a preview of which you can see at Testing to see if post scheduled to published at future dates using iContact will be published as scheduled (click BACK button to get back to this page). If it works, you should see the same post published on Sunday 17 June 2007, 12pm.
I tested to see if I can prepare post with images uploaded via the Blogger photo upload icon can be published via iContact, however, it didn't work out. But they have a responsive support team. I received this to my query: "At the current time, it is not possible to include scripts in a message sent through iContact. You will not be able to use a script in your post to insert additional content". It says "At current time, but didn't state if they have plans to introduce that in the future. It would be a useful additional feature if they do eventually add the feature.
So I had to use alternative methods. I used Photobucket to upload a screenshot and used the <img src="photo URL" to include images in my messages. I have done so many tests and didn't keep a record, so I can't really state with 100% certainty if scheduling posts will work, but if you see the post I have scheduled for publishing on Sunday 17 June 2007, 12pm with a screenshot, that means it works. Will update this if and when I see that post published. Anyway, uploading photos to Photobucket and using the <img src="photo URL" width="W" /> to display images does work.
There is another feature available via iContact - using a template to prepare a message (post). They say they have extremely easy to use over 400 professionally-designed templates (I have tried one and I can concur that it is easy to use). I have actually published a post via iContact using one of their template, and you can see the result here: Testing publishing via iContact with a template. You can use different template for different post to suit the post content and you should have an interesting and attractive blog in this way.
However, note that the template is very wide and would not fit into the main column (post) width of most template. This may cause problems, particularly the 3 column templates and the template with a right sidebar. I have thus chosen to publish that post with a blog with 2 left sidebars.
However, note that the above post (published with a template) was sent by selecting "send test message". When you proceed to send a message via iContact, you will have to go through a long series of steps. You click the "Messages" sub-tab, then "create". You will then have 4 choices (sections) - "My messages", "My surveys", "My autoresponders" and "Image Libraries" (you will have to upload your own images to be hosted by iContact). If you are going to send a message, click "Create a message" in the "My messages" section. You will then be presented with 4 choices - "Create a new message using MessageBuilder" (this will include using a ready-made template without any need for HTML knowledge), "Create a New Message from Scratch" and "Copy and Paste a Messsage" (this will be your choice if you prepare your message using Dreamweaver, FrontPage or other commercial HTML editors including the Blogger post editor).
I have tested using the "Create a New Message from Scratch" option. You can select either HTML or Plain Text. You will have to enter a "Message Subject". I have found a very irritating "pop-up" whenever you try to type in a message subject that are similar to your previous message subjects. Each time you type in something, the pop-up containing all your past message subjects appeared and block your field and prevent you from completing your new message subject. You will have to click somewhere on the page to get rid of the "pop-up". You may have to do this numerous times, depending on what you are typing. If an iContact representative happens to read this, I hope he/she will consider my suggestion to place the "pop-up" so that it does not cover the subject field.
Your HTML message window will be below if you have selected "HTML and you will prepare your HTML message in that window. However, you cannot send the message immediately or you will get the message:
"This message cannot be sent.
* Your message does not contain a text version. Messages without text versions are much more likely to be tagged as spam. Please enter a text message."
You will have to click the "Copy Text" button to copy a text version of your HTML message into the "Rich Text Message editor window". Further down, you will see a "Send Test Message" box:
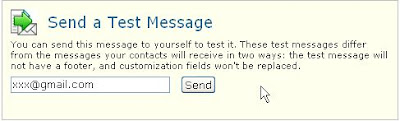
That was how I publish the post Testing publishing via iContact with a template, by opting to send a test message to the Mail-to-Blogger Address. The other choice is to click on the "Send" button. If you do that, you will get to another page where you have to click on the "Proceed to Send"
  button. You will then be presented an "initial" field to enter, and some choices as seen in the screenshot below (click on screenshot to enlarge):

For the scheduling post to be publish in the future test described above, I have opted for "Schedule Delivery". What will be the result, we will see later and I will update this when the result is out.
I have also tested "Deliver Immediately" and have got some disappointing result. When I clicked that button, I got the message "Your message has been queued and will be sent shortly". I have tested it numerous time, including publishing to Blogging Ideas and to date, I still have not seen the post published. I have also tested sending a test message to my mailbox, but to date, still have not receive it. (Update: the message was received OK).
Update 19 June 2007: Received a response to my query to iContact support, which I think is relevant to this post:
"Thank you for your email. When you click Deliver Immediately, that starts the send process right away, but depending on server traffic, the potential for human review, and the general nature of bulk email movement, we cannot guarantee immediate delivery of any message. We actually recommend allowing up to an hour at times, though, it almost never takes that long. We also had an issue over the week that was causing messages to appear stuck in pending when they were actually sending on schedule. This was caused by server crossover issues when we changed our name to icontact. I apologize for this, we are doing everything we can to prevent it from happening again.
It looks like the blog was published to URL:
Enviroman."
If my memory is not faulty, I had put the mail-to-blogger address to publish via email, but somehow ended up in a blog set up using iContact. I don't think I want or have time to test again. If you are interested, you can try as they offer 15-days freee trial period.
You can also set up a blog or blogs with iContact. I have set up a rudimentary test blog at Enviroman, but since I am only using a 15 days trial subscription, I do not know if this test blog will remain on the web when the trial subscription ends. A casual blogger may not want to subscribe to iContact, but with the number of features offered, a serious blogger, especially those who do business blogs should seriously consider iContact.
Update 27 June 2007: Got this response from iContact support team on 25 Jun 2007
"Last week, we were experiencing some difficulties with our sending queue. Messages were delayed in sending and there was a considerable backlog of messages in the queue for several days. I have a feeling that this issue was the reason for the schedule foul up.
The good news is that that issue has been resolved, so if you try scheduling a message again, it should go through without any problems."
So you may still be able to use iContact to schedule your posts to Blogger. You may want to test it. As for me, maybe I will have to wait for a less busy time to do it.
I previously published a post for a work-around: Prepare post to be published in the future. Unfortunately the site that enable this work-around is no longer online. The domain was not renewed. The creator probably found his venture not viable as a free service.
UPDATE November 3 2007: Forgot to mention this post: Scheduling future posts using Time Cave (click BACK button to get back to this page).
Here is a possible alternative - iContact. iContact is an email marketing and blogging tool that makes it easy for people to create, publish, and track email newsletters, blogs, RSS feeds, surveys, and autoresponders. With the autoresponder, you can prepare messages to be sent to subscribers according to, say, 3 day, 1 week, 2 weeks, etc, from the date they subscribed.
I have examined the features available in iContact, and one thing that attracted me was the possibility to schedule messages to be sent in a future date. This feature can be used in the same way to schedule post to be published to Blogger as described in Prepare post to be published in the future. I have prepared a post, a preview of which you can see at Testing to see if post scheduled to published at future dates using iContact will be published as scheduled (click BACK button to get back to this page). If it works, you should see the same post published on Sunday 17 June 2007, 12pm.
I tested to see if I can prepare post with images uploaded via the Blogger photo upload icon can be published via iContact, however, it didn't work out. But they have a responsive support team. I received this to my query: "At the current time, it is not possible to include scripts in a message sent through iContact. You will not be able to use a script in your post to insert additional content". It says "At current time, but didn't state if they have plans to introduce that in the future. It would be a useful additional feature if they do eventually add the feature.
So I had to use alternative methods. I used Photobucket to upload a screenshot and used the <img src="photo URL" to include images in my messages. I have done so many tests and didn't keep a record, so I can't really state with 100% certainty if scheduling posts will work, but if you see the post I have scheduled for publishing on Sunday 17 June 2007, 12pm with a screenshot, that means it works. Will update this if and when I see that post published. Anyway, uploading photos to Photobucket and using the <img src="photo URL" width="W" /> to display images does work.
There is another feature available via iContact - using a template to prepare a message (post). They say they have extremely easy to use over 400 professionally-designed templates (I have tried one and I can concur that it is easy to use). I have actually published a post via iContact using one of their template, and you can see the result here: Testing publishing via iContact with a template. You can use different template for different post to suit the post content and you should have an interesting and attractive blog in this way.
However, note that the template is very wide and would not fit into the main column (post) width of most template. This may cause problems, particularly the 3 column templates and the template with a right sidebar. I have thus chosen to publish that post with a blog with 2 left sidebars.
However, note that the above post (published with a template) was sent by selecting "send test message". When you proceed to send a message via iContact, you will have to go through a long series of steps. You click the "Messages" sub-tab, then "create". You will then have 4 choices (sections) - "My messages", "My surveys", "My autoresponders" and "Image Libraries" (you will have to upload your own images to be hosted by iContact). If you are going to send a message, click "Create a message" in the "My messages" section. You will then be presented with 4 choices - "Create a new message using MessageBuilder" (this will include using a ready-made template without any need for HTML knowledge), "Create a New Message from Scratch" and "Copy and Paste a Messsage" (this will be your choice if you prepare your message using Dreamweaver, FrontPage or other commercial HTML editors including the Blogger post editor).
I have tested using the "Create a New Message from Scratch" option. You can select either HTML or Plain Text. You will have to enter a "Message Subject". I have found a very irritating "pop-up" whenever you try to type in a message subject that are similar to your previous message subjects. Each time you type in something, the pop-up containing all your past message subjects appeared and block your field and prevent you from completing your new message subject. You will have to click somewhere on the page to get rid of the "pop-up". You may have to do this numerous times, depending on what you are typing. If an iContact representative happens to read this, I hope he/she will consider my suggestion to place the "pop-up" so that it does not cover the subject field.
Your HTML message window will be below if you have selected "HTML and you will prepare your HTML message in that window. However, you cannot send the message immediately or you will get the message:
"This message cannot be sent.
* Your message does not contain a text version. Messages without text versions are much more likely to be tagged as spam. Please enter a text message."
You will have to click the "Copy Text"
 button to copy a text version of your HTML message into the "Rich Text Message editor window". Further down, you will see a "Send Test Message" box:
That was how I publish the post Testing publishing via iContact with a template, by opting to send a test message to the Mail-to-Blogger Address. The other choice is to click on the "Send"
 button. If you do that, you will get to another page where you have to click on the "Proceed to Send"
  button. You will then be presented an "initial" field to enter, and some choices as seen in the screenshot below (click on screenshot to enlarge):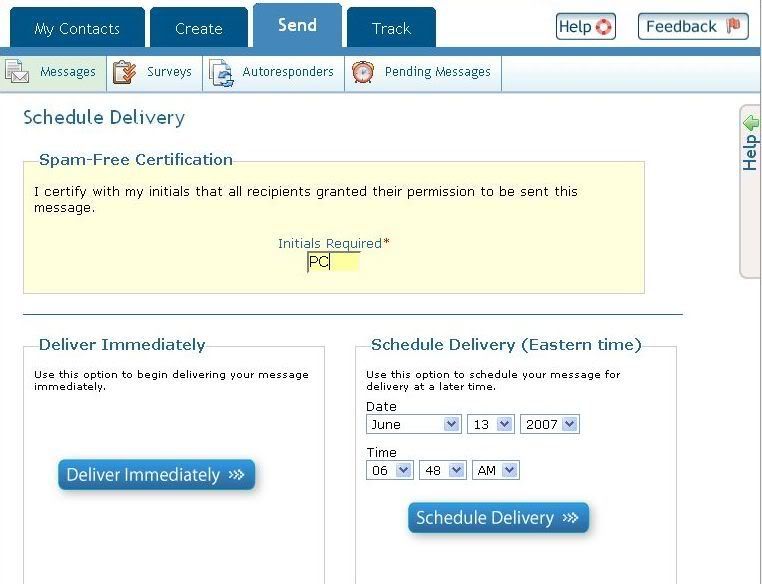
For the scheduling post to be publish in the future test described above, I have opted for "Schedule Delivery". What will be the result, we will see later and I will update this when the result is out.
I have also tested "Deliver Immediately" and have got some disappointing result. When I clicked that button, I got the message "Your message has been queued and will be sent shortly". I have tested it numerous time, including publishing to Blogging Ideas and to date, I still have not seen the post published. I have also tested sending a test message to my mailbox, but to date, still have not receive it. (Update: the message was received OK).
Update 19 June 2007: Received a response to my query to iContact support, which I think is relevant to this post:
"Thank you for your email. When you click Deliver Immediately, that starts the send process right away, but depending on server traffic, the potential for human review, and the general nature of bulk email movement, we cannot guarantee immediate delivery of any message. We actually recommend allowing up to an hour at times, though, it almost never takes that long. We also had an issue over the week that was causing messages to appear stuck in pending when they were actually sending on schedule. This was caused by server crossover issues when we changed our name to icontact. I apologize for this, we are doing everything we can to prevent it from happening again.
It looks like the blog was published to URL:
Enviroman."
If my memory is not faulty, I had put the mail-to-blogger address to publish via email, but somehow ended up in a blog set up using iContact. I don't think I want or have time to test again. If you are interested, you can try as they offer 15-days freee trial period.
You can also set up a blog or blogs with iContact. I have set up a rudimentary test blog at Enviroman, but since I am only using a 15 days trial subscription, I do not know if this test blog will remain on the web when the trial subscription ends. A casual blogger may not want to subscribe to iContact, but with the number of features offered, a serious blogger, especially those who do business blogs should seriously consider iContact.
Update 27 June 2007: Got this response from iContact support team on 25 Jun 2007
"Last week, we were experiencing some difficulties with our sending queue. Messages were delayed in sending and there was a considerable backlog of messages in the queue for several days. I have a feeling that this issue was the reason for the schedule foul up.
The good news is that that issue has been resolved, so if you try scheduling a message again, it should go through without any problems."
So you may still be able to use iContact to schedule your posts to Blogger. You may want to test it. As for me, maybe I will have to wait for a less busy time to do it.
Monday, May 28, 2007

In response to a blogger query as to whether it is possible to make a post title an image which is clickable (a hyperlink), I am now trying to test that now. If it is successful, you should see an image in the post title. If not, I will just have to change the post title and update this post.
Well, as you can see, the title of this post is an image. Try clicking on it and see what happens.
For further information, I will put what is inside the post title (in the post editor) in a scrollbox below:
Just one note. If my memory didn't fail me, I did the test with a photo hosted by Blogger as described in this post: Getting New Blogger to host pictures for your profile, sidebar, Header, etc.. However, it couldn't published and I can't remember if there was a message that the character length exceeded the limit set by Blogger. There probably was, but maybe one day I will test that as well. This probably was because the picture URL using that method was too long. I uploaded the picture to Photobucket and this test was successful as Photobucket gives a shorter URL for the picture.
Well, as you can see, the title of this post is an image. Try clicking on it and see what happens.
For further information, I will put what is inside the post title (in the post editor) in a scrollbox below:
<a href="http://blogger-tricks.blogspot.com"><img src="http://img.photobucket.com/albums/v336/cikgu/newpost.jpg" alt="test"></a>
Just one note. If my memory didn't fail me, I did the test with a photo hosted by Blogger as described in this post: Getting New Blogger to host pictures for your profile, sidebar, Header, etc.. However, it couldn't published and I can't remember if there was a message that the character length exceeded the limit set by Blogger. There probably was, but maybe one day I will test that as well. This probably was because the picture URL using that method was too long. I uploaded the picture to Photobucket and this test was successful as Photobucket gives a shorter URL for the picture.
Sunday, May 20, 2007
Testing to see if images, when deleted, will also be removed from the Web.
In Old Blogger, after you upload a picture, irrespective of whether you delete the picture from the post or delete the whole post itself, the picture will remain on the web. I believe that is no longer true for New Blogger and I am going to test it in this post. I will post a picture of a castle beside the Sarawak River in Kuching, Borneo Island, Malaysia below:
(photo deleted 24 May 2007)
This picture will be deleted in a few days tine. To enable you to see if the picture is still on the web, I put the URLs of the picture in the scrollbox below:
Update: 26 May 2007: The first link resulted in a webpage displaying the photo. The second and third link lead to Microsoft Photo editor displaying the photo. Looks like I will have to test the links again because if I am not wrong, the Blogger Help page said they will be removed from the web after 24 hours. I have made another post with a picture which will be deleted, and for record purposes, I put the picture URLs below in a scrollbox:
Update 11 June 2007: The result for the first test is still the same. First URL led to a photo on the web, second and third URL led to the photo being downloaded, with the second URL giving a smaller image and the third URL giving a larger photo.
For the second test (post deleted), first URL led to a message [delete+photo.jpg]
and second and third URL led to error message:
Not Found
The requested URL /s400 was not found on this server.
I want to test again because it has come to my knowledge that when you delete a post with photos, there are options of whether to leave the photo on the web or delete them. It could be that in my deleting post test, the options were below the fold and I did not see it. So I am going to publish another post with photo and then delete the post. Will report again the result.
Update 11 June 2007 (second update): I published a post with 2 images. The URL of the photos are in the scrollbox below, with the first URL being the first one in the HTML for the image (same as the URL you will see in the address bar when you click on a picture), the second being the second URL in the image HTML and the third the actual URL of the image which you get by selecting VIEW > PAGE SOURCE in the menu bar of the browser when you are in a page with just the image:
When I delete the post, the following options appeared and it was right above the fold, very visible. So it must have been introduced after I did the earlier test, otherwise I would have seen it:

I have deleted the post, with one to keep and the other one to be deleted. Let us see what happens after 24 hours.
Update 13 June 2007: I tested the photo URLs above and for the URLs of the photo which I opt to be retained when I deleted the post, the photo could still be seen on the web or can be downloaded. For photo URLs above for which I opted to be deleted, they resulted in a [something] dispalyed (no photo, but cannot copy and paste for Flock browser I am currently using), or resulted in a 404 Not Found error message. You can copy the URLs, paste them in the browser address bar and try them yourself.
(photo deleted 24 May 2007)
This picture will be deleted in a few days tine. To enable you to see if the picture is still on the web, I put the URLs of the picture in the scrollbox below:
https://blogger.googleusercontent.com/img/b/R29vZ2xl/AVvXsEgjW7tWZHdgVpl2MfHo2mzYb5i60cJxcyXMXgVXWiWo3P3ng7ibZCZob3lCViX8O6xX9E6Y5j9ZeRiK0_WfMpsvvthV7WZWPCoW94W1LOJihmLhceLldvY4pweBWK-Mby-LeehL2cE9Nm5N/s1600-h/CastleBySarawakRiver.JPG
https://blogger.googleusercontent.com/img/b/R29vZ2xl/AVvXsEgjW7tWZHdgVpl2MfHo2mzYb5i60cJxcyXMXgVXWiWo3P3ng7ibZCZob3lCViX8O6xX9E6Y5j9ZeRiK0_WfMpsvvthV7WZWPCoW94W1LOJihmLhceLldvY4pweBWK-Mby-LeehL2cE9Nm5N/s400/CastleBySarawakRiver.JPG
https://blogger.googleusercontent.com/img/b/R29vZ2xl/AVvXsEgjW7tWZHdgVpl2MfHo2mzYb5i60cJxcyXMXgVXWiWo3P3ng7ibZCZob3lCViX8O6xX9E6Y5j9ZeRiK0_WfMpsvvthV7WZWPCoW94W1LOJihmLhceLldvY4pweBWK-Mby-LeehL2cE9Nm5N/s1600/CastleBySarawakRiver.JPG
https://blogger.googleusercontent.com/img/b/R29vZ2xl/AVvXsEgjW7tWZHdgVpl2MfHo2mzYb5i60cJxcyXMXgVXWiWo3P3ng7ibZCZob3lCViX8O6xX9E6Y5j9ZeRiK0_WfMpsvvthV7WZWPCoW94W1LOJihmLhceLldvY4pweBWK-Mby-LeehL2cE9Nm5N/s400/CastleBySarawakRiver.JPG
https://blogger.googleusercontent.com/img/b/R29vZ2xl/AVvXsEgjW7tWZHdgVpl2MfHo2mzYb5i60cJxcyXMXgVXWiWo3P3ng7ibZCZob3lCViX8O6xX9E6Y5j9ZeRiK0_WfMpsvvthV7WZWPCoW94W1LOJihmLhceLldvY4pweBWK-Mby-LeehL2cE9Nm5N/s1600/CastleBySarawakRiver.JPG
Update: 26 May 2007: The first link resulted in a webpage displaying the photo. The second and third link lead to Microsoft Photo editor displaying the photo. Looks like I will have to test the links again because if I am not wrong, the Blogger Help page said they will be removed from the web after 24 hours. I have made another post with a picture which will be deleted, and for record purposes, I put the picture URLs below in a scrollbox:
First URL in the picture HTML
http://2.bp.blogspot.com/_sEyw6txVACs/RlccmyTd7tI/AAAAAAAAAi4/u2P8voCElgc/s1600-h/delete+photo.jpg
Second URL in the picture HTML
http://2.bp.blogspot.com/_sEyw6txVACs/RlccmyTd7tI/AAAAAAAAAi4/u2P8voCElgc/s400/delete+photo.jpg
By clicking on the picture and viewing Page Source
http://2.bp.blogspot.com/_sEyw6txVACs/RlccmyTd7tI/AAAAAAAAAi4/u2P8voCElgc/s1600/delete%2Bphoto.jpg
http://2.bp.blogspot.com/_sEyw6txVACs/RlccmyTd7tI/AAAAAAAAAi4/u2P8voCElgc/s1600-h/delete+photo.jpg
Second URL in the picture HTML
http://2.bp.blogspot.com/_sEyw6txVACs/RlccmyTd7tI/AAAAAAAAAi4/u2P8voCElgc/s400/delete+photo.jpg
By clicking on the picture and viewing Page Source
http://2.bp.blogspot.com/_sEyw6txVACs/RlccmyTd7tI/AAAAAAAAAi4/u2P8voCElgc/s1600/delete%2Bphoto.jpg
Update 11 June 2007: The result for the first test is still the same. First URL led to a photo on the web, second and third URL led to the photo being downloaded, with the second URL giving a smaller image and the third URL giving a larger photo.
For the second test (post deleted), first URL led to a message [delete+photo.jpg]
and second and third URL led to error message:
Not Found
The requested URL /s400 was not found on this server.
I want to test again because it has come to my knowledge that when you delete a post with photos, there are options of whether to leave the photo on the web or delete them. It could be that in my deleting post test, the options were below the fold and I did not see it. So I am going to publish another post with photo and then delete the post. Will report again the result.
Update 11 June 2007 (second update): I published a post with 2 images. The URL of the photos are in the scrollbox below, with the first URL being the first one in the HTML for the image (same as the URL you will see in the address bar when you click on a picture), the second being the second URL in the image HTML and the third the actual URL of the image which you get by selecting VIEW > PAGE SOURCE in the menu bar of the browser when you are in a page with just the image:
URL of image to be retained
https://blogger.googleusercontent.com/img/b/R29vZ2xl/AVvXsEibi06v9wsXf7TSLQAHnmoq7_BPMdbC7V1NrM3lQCDQLEsAdc2e42ud4SLkAYPhWY8QYAR6tkZOflNAg7is7KVpc_WxQOMOiKs7iHAtBhZ0aOJd68kGAmbANLSr8IIp_Gn86KvCCsl4GjjB/s1600-h/Blogger+Contact+Us.jpg
https://blogger.googleusercontent.com/img/b/R29vZ2xl/AVvXsEibi06v9wsXf7TSLQAHnmoq7_BPMdbC7V1NrM3lQCDQLEsAdc2e42ud4SLkAYPhWY8QYAR6tkZOflNAg7is7KVpc_WxQOMOiKs7iHAtBhZ0aOJd68kGAmbANLSr8IIp_Gn86KvCCsl4GjjB/s400/Blogger+Contact+Us.jpg
https://blogger.googleusercontent.com/img/b/R29vZ2xl/AVvXsEibi06v9wsXf7TSLQAHnmoq7_BPMdbC7V1NrM3lQCDQLEsAdc2e42ud4SLkAYPhWY8QYAR6tkZOflNAg7is7KVpc_WxQOMOiKs7iHAtBhZ0aOJd68kGAmbANLSr8IIp_Gn86KvCCsl4GjjB/s1600/Blogger+Contact+Us.jpg
URL of image to be deleted from web
http://1.bp.blogspot.com/_sEyw6txVACs/RmxlveFJmSI/AAAAAAAAAjc/Ty9kAyh5GXg/s1600-h/amazon+gift+ideas.jpg
http://1.bp.blogspot.com/_sEyw6txVACs/RmxlveFJmSI/AAAAAAAAAjc/Ty9kAyh5GXg/s400/amazon+gift+ideas.jpg
http://1.bp.blogspot.com/_sEyw6txVACs/RmxlveFJmSI/AAAAAAAAAjc/Ty9kAyh5GXg/s1600-h/amazon+gift+ideas.jpg
https://blogger.googleusercontent.com/img/b/R29vZ2xl/AVvXsEibi06v9wsXf7TSLQAHnmoq7_BPMdbC7V1NrM3lQCDQLEsAdc2e42ud4SLkAYPhWY8QYAR6tkZOflNAg7is7KVpc_WxQOMOiKs7iHAtBhZ0aOJd68kGAmbANLSr8IIp_Gn86KvCCsl4GjjB/s1600-h/Blogger+Contact+Us.jpg
https://blogger.googleusercontent.com/img/b/R29vZ2xl/AVvXsEibi06v9wsXf7TSLQAHnmoq7_BPMdbC7V1NrM3lQCDQLEsAdc2e42ud4SLkAYPhWY8QYAR6tkZOflNAg7is7KVpc_WxQOMOiKs7iHAtBhZ0aOJd68kGAmbANLSr8IIp_Gn86KvCCsl4GjjB/s400/Blogger+Contact+Us.jpg
https://blogger.googleusercontent.com/img/b/R29vZ2xl/AVvXsEibi06v9wsXf7TSLQAHnmoq7_BPMdbC7V1NrM3lQCDQLEsAdc2e42ud4SLkAYPhWY8QYAR6tkZOflNAg7is7KVpc_WxQOMOiKs7iHAtBhZ0aOJd68kGAmbANLSr8IIp_Gn86KvCCsl4GjjB/s1600/Blogger+Contact+Us.jpg
URL of image to be deleted from web
http://1.bp.blogspot.com/_sEyw6txVACs/RmxlveFJmSI/AAAAAAAAAjc/Ty9kAyh5GXg/s1600-h/amazon+gift+ideas.jpg
http://1.bp.blogspot.com/_sEyw6txVACs/RmxlveFJmSI/AAAAAAAAAjc/Ty9kAyh5GXg/s400/amazon+gift+ideas.jpg
http://1.bp.blogspot.com/_sEyw6txVACs/RmxlveFJmSI/AAAAAAAAAjc/Ty9kAyh5GXg/s1600-h/amazon+gift+ideas.jpg
When I delete the post, the following options appeared and it was right above the fold, very visible. So it must have been introduced after I did the earlier test, otherwise I would have seen it:

I have deleted the post, with one to keep and the other one to be deleted. Let us see what happens after 24 hours.
Update 13 June 2007: I tested the photo URLs above and for the URLs of the photo which I opt to be retained when I deleted the post, the photo could still be seen on the web or can be downloaded. For photo URLs above for which I opted to be deleted, they resulted in a [something] dispalyed (no photo, but cannot copy and paste for Flock browser I am currently using), or resulted in a 404 Not Found error message. You can copy the URLs, paste them in the browser address bar and try them yourself.
Subscribe to:
Posts (Atom)