Saturday, February 24, 2007

Testing Flock with Blogger

In my post Testing various ways of publishing a picture with Windows Live Writer, a reader suggested I check out Flock Browser. So I downloaded Flock and am preparing this post to be published now.

What I am looking for in particular is to be able to prepare a post with pictures offline to be published to Blogger either immediately or in a future date. But the Flock User Interface is a disappointment. There is a menu bar at the top, a field for you to add in a title below that, then a toolbar comprising some formatting tool icons including "Bold", "Italic", "Strickthrough", "Cut". "Copy", "Paste", "Bullet List", "Numbered List", "Outdent", "Indent", "Link", "Unlink", and "Check Spelling". That is it. See screeshot below (see update below :

No icon for posting pictures". That is a disappointment. However, I will test the "Indent" tool" out as I have previously written about Indenting a paragraph at this post How to get Indent for your post paragraphs. However, unlike Windows Live Writer, there is no option to switch between a "WYSIWYG" mode and an EDIT HTML mode. The first link above was prepared by hardcoding the hyperlink (didn't work, it appeared as text. Had to delete and redo the link using the link icon in the toolbar), whereas the second link was prepared by using the "Link" icon in the toolbar. I want to make the link open in new tag, but there is no provision for me to switch to an EDIT HTML mode to do that.

I tried to post a screenshot of the Flog Post Editor Window by first uploading it in a blog specially created to host photos for purposes like this, copied the HTML for the screenshot, but it didn't work out. Since the hyperlink tag did not work, I expect the img tag also would not work. I will publish this post as is, then edit the post in Blogger post editor window to include the screenshot.


Here is a screenshot of the Flock Post Editor Window, added via the Blogger post editor window after publishing with Flock:

Flock Post Editor Window

Here is the screenshot of the resulting post when I tried using HTML for hyperlink and the screenshot:

publishing errors with Flock

Update 26 February 2007: Read something about the ability to drag and drop pictures into Flock, but till now, still haven't found the way to do it. If you know the process, do comment in the comments section.

In summary, Flock is an additional option for those who want authoring tool to prepare their post for their blog (in particular, offline), but in my opinion, Windows Live Writer is a better choice.

Blogged with Flock

Thursday, February 22, 2007

Testing various ways of posting pictures via Windows Live Writer

From the taskbar at the right: ( Webpage URL) 

Sarawak River

Wednesday, February 21, 2007

Testing inserting of pictures with Windows Live Writer without FTP

This test is a result of a comment from Brett who said that there are at least 4 ways and types of pictures that can be inserted with Live Writer:

1. through the taskbar which when uploaded, requires one to configure a destination to receive the pictures.

2. through the menu at the top for linking to an image already on the Internet

3. through the menu at the top you can also upload there (don't understand this one, thought I'll give it a shot later

4. hard code one in through html (looks like this will require a picture to be already on the Internet).

Now trying No. 1, via the taskbar at the right:

Below will be a screenshot of what I see in the Windows Live Writer window (I have to hardcode the screenshot using the <img> tag as earlier tests already showed that the result will probably result in a blank box. I chose Webpage URL and then input the URL of the screenshot which had already been hosted in the Web:


Update: When I first hardcoded the HTML for the screenshot, I forgot to take into consideration the width of the screenshot, and it extended into the sidebar in FireFox (and probably make the sidebar drop to the bottom of the page in Internet Explorer. I had to log into Blogger to edit this page and added the attribute width="390" into the <img> tag (width of the main column is 400px).

Summarising, to blog from Windows Live Writer which include pictures, the best is if you are blogging via FTP (which means in the New Blogger, you have to use the old classic template). Without FTP, you need to know HTML and to have the pictures already hosted on the web with the picture properly resized to fit the main column, then use the <img> tag to publish it, or if you have not resized your picture, to use the width="X" attribute to make the picture fit into the main column.

Unfortunately, I do not use FTP, so I am very limited in testing this Windows Live Writer, and writing about the various tests I am going to make will probably make very complicated reading, so I will continue my testing with another test blog, and then make a post about how to use Windows Live Writer in my main blog Blogger Tips and Tricks when I am ready.

Tuesday, February 20, 2007

Testing blogging from Windows Live Writer again, but this time using the WYSISYG mode

The last attempt at posting a picture from Windows Live Writer resulted in a small blank square in place of the picture. Perhaps that was because I was using the HTML Code mode. I am now going to try to publish a photo from Windows Live Writer, but using the Web Layout (WYSIWYG) mode.

I am inserting a picture here:

The result is an error message which I will add after I publish this post.  (Result: I I responded "No" to the error message, I was taken back to the editing window. Looks like I have to delete the photo first before I publish. But before that, I will show you a screenshot of what I see before I delete the picture (after I publish from Windows Live Writer):


Windows Live Writer Error Message 2

Well, looks like if you want to prepare a post with Windows Live Writer and you want to include a picture saved in your computer, you need to be using FTP to be able to do it. The alternative is to upload the photo to an extenal photo host, then use the <img> tag in the EDIT HTML mode.

Testing blogging from Windows Live Writer

Someone asked for an WYSIWYG (What You See Is What You Get) authoring tool, and I responded asking why should one need a WYSISYG authoring as the COMPOSE mode is WYSIWYG (well, almost). However, Brett of Maven Mapper's Information suggested Windows Live Writer. I use an ADSL always on service provider, and perhaps for me, there is no need for such a tool, but now I can see the need for one who is using dial-up and/or time based service provider. Also, if this works out, it will tie in nicely with the method I suggested for preparing post to be published in the future. See How to prepare a post to be published in the future. So I am now testing to see how it works out. I am going to try putting in some images:

Well, looks like it inserts an <img> tag and the source of the picture is a path to the file in my computer. Now, when I publish this, I wonder what is going to happen.

UPDATE: Well, the photo just appeared a a blank square. Perhaps that was because I want to try to make the picture a hyperlink to Guide to Malaysia for reasons I will explain later. For for that, I need to be in the EDIT HTML mode. I post below the actual screenshot of Windows Live Writer as I tried to prepare the above post:

Windows Live Writer

I am going to try to do the same thing in the next post, but this time use the WYSIWYG mode. I have done it and you can see the result at Testing blogging from Windows Live Writer again, but this time using WYSISYG mode

Saturday, February 17, 2007

Toggle Show/Hide navbar Hack

Derya commented in one of my posts, alerting me to a hack that will enable you to put a script in a Page Element which will display a text show/hide navbar hack which when clicked upon will hide the navbar if it is displayed, and display the navbar if it is hacked. As I don't want to execute the hack in this blog, I tested it in the blog Computer and Internet Articles. The toggle switch (which is the text you see above) is placed at the bottom of the right sidebar, below my profile. Click on it and observe what happens to the navbar.

You can get Derya's hack here How to hide the navbar? if you are interested in the hack. It is very easy to implement. All you have to do is to get to the template editor, look for the <head> tag, then paste the script he has given. When I implemented the hack, I only made some small modification to the hack. I put a comment (part of a program that does nothing but document a program to make it easy to follow and understand). I put the comment
<!-- Show/Hide navbar begins --> followed by the script, then at the end of the script, I marked it with the comment
<!-- Show/Hide navbar ends -->

For easier understanding, I put the script below:


<head>

<!-- Show/Hide navbar begins -->
<script type="text/javascript">
var showHeader=false;
function ShowHideNav()
{
showHeader=!showHeader;
var nav=document.getElementById("navbar-iframe");
if (showHeader)
{
nav.style.visibility="visible";
nav.style.display="block";
}
else
{
nav.style.visibility="hidden";
nav.style.display="none";
}
}
</script>
<style type="text/css">
#navbar-iframe {
visibility: hidden;
display: none;
}
</style>
<!-- Show/Hide navbar ends -->


The part in black (<head>) is what is already in the template, and the part in red are what is added to the template.

You will then have to add this to a page element in a part of the blog that you choose:

<!-- Show/Hide navbar hack -->
<span style="cursor:pointer;" onclick="ShowHideNav();">
Show/Hide Navigation
</span>

Saturday, February 10, 2007

How to get a template for a blog with only a main column and no sidebar

Assuming that you are using Douglas Bowman Minima two column template, sign into Dashboard, choose the blog and click Layout, then click the TEMPLATE > EDIT HTML tabs to open the template editor window.

First, backup your template by clicking DOWNLOAD FULL TEMPLATE and save it in a suitable folder with a suitable file name.

Then look for the following block of codes:

#header-wrapper {
width:660px;
margin:0 auto 10px;
border:1px solid $bordercolor;
}

Change it to

#header-wrapper {
width:750px;
margin:0 auto 10px;
border:1px solid $bordercolor;
}

Look further down for this block of codes

#outer-wrapper {
width: 660px;
margin:0 auto;
padding:10px;
text-align:left;
font: $bodyfont;
}

Change it to

#outer-wrapper {
width: 750px;
margin:0 auto;
padding:10px;
text-align:left;
font: $bodyfont;
}

Look further down the template for this block of codes:

#main-wrapper {
width: 410px;
float: left;

Change it to

#main-wrapper {
width: 750px;
float: left;

Look further down the template for this block of codes:

#sidebar-wrapper {
width: 220px;
float: right;
word-wrap: break-word; /* fix for long text breaking sidebar float in IE */
overflow: hidden; /* fix for long non-text content breaking IE sidebar float */
}

Delete it.

Preview the template, and if satisfied, save the template

Friday, February 09, 2007

Testing a Wimpy player for a reader

A reader of my blogs complained that the script generated by the software he purchased for a MP3 player is being rejected by the HTML/Javascript Page Element of the Layout. The script he gave was an URL, so it can't be placed in a HTML/Page Element unless it is written as a hyperlink.

Testing if writting it into this post will do the trick. Why I am putting below the scroll box is the HTML

<a href="http://www.thefunkykind.com/myWimpy.html" target="_blank">My Wimpy Player</a>


Here goes:
My Wimpy Player

Also, testing if putting the hyperlink into a HTML/Javascrip Page Element will work. Look for "My Wimpy Player" at the bottom of the left sidebar. Try clicking on the links and see what you get.

Monday, February 05, 2007

Testing embedding video in Blogger

A reader of my blogs posted a question in my post Migration to New Blogger (formerly beta) about uploading vidoe to his blog. My answer to him is he will have to host his video with a host like http://www.youtube.com/ and then copy the given script to embed into a post.

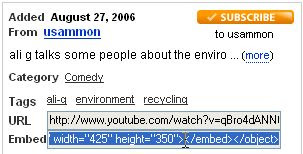
Script for Embedding Youtube videoI decided to test embedding of video myself to confirm my answer to his question. I made a search for environmental videos (my first blog is Enviroman Says), found a video related to the environment. I copied the script for embedding (not the URL, see screenshot), and tried to embed the video into a post, but found the video window to be too wide. This was the original script:

<object width="425" height="350"><param name="movie" value="http://www.youtube.com/v/qBro4dANNGU"></param><param name="wmode" value="transparent"></param><embed src="http://www.youtube.com/v/qBro4dANNGU" type="application/x-shockwave-flash" wmode="transparent" width="425" height="350"></embed></object>


The width of the main column of this blog is 400px, but for the video, it was width="425" height="350". So what I did was to open a picture (any picture) with Irfanview, resize the image to 425x350 (Preserve aspect ratio radio button unchecked, the picture will of course become distorted), then check the radio button to preserve the aspect ratio and resize the width to 395. The height automatically changed to 325, so I changed the height and width of the video to width="395" height="325". (Note: Instead of opening any picture, you can also create an empty image 425x350, then with the preserve aspect ratio ticked, change the width to the width {or slightly less} of your main column , then resize). For those not familiar with how to find the widths of the various parts of you blog, refer to How to find the widths of your blog Header, main column (posts), sidebar. For those not familiar, I hope to do some tutorials later in the future and hope that I will remember to post a link here. Otherwise, try searching in my blogs in the "Blogger Resources" section in the right sidebar.

There were two places in the script where I had to change the width and the height. The new script which I posted in this post to produce the video below is as follows:

<object width="395" height="325"><param name="movie" value="http://www.youtube.com/v/qBro4dANNGU"></param><param name="wmode" value="transparent"></param><embed src="http://www.youtube.com/v/qBro4dANNGU" type="application/x-shockwave-flash" wmode="transparent" width="395" height="325"></embed></object>


If you want to learn how to change the width of Youtube or other video websites, refer to FAQ: Youtube, Google video and Blogger.com

Sunday, February 04, 2007

Testing uploading of a tall picture.

Petronas Twin Tower, Kualal Lumpur, MalaysiaPetronas Twin Tower
There have been complaints of Blogger orientating a tall picture horizontally. I also received a comment in my post Uploading and manipulating photos in Blogger which seem to me to be the same complaint (confirmed in his second comment). So I am now uploading a tall vertical picture to see how it appears. The photo is that of the Petronas Twin Tower, which used to be the tallest building in the world, but now I suppose can only claim to the the tallest twin tower in the world. BTW 2007 is Visit Malaysia Year with lots of things going on. 2007 will be a good year to visit Malaysai.

Now I am going to do a further test. I am going to use Irfanview to orientate the picture horizontally and upload it and see how it turns out. Here goes:

Petronas Twin Tower orientated horizontally

Update: Well, the image is published as it is orientated, so in conlusion, Blogger does not tamper with the orientation of your picture. His second comment said he didn't understand why it was different for me and for him. I am also wondering why, because I don't face the same problems that are often reported in the Google Blogger Help group. I wonder if having one's blog in a different server makes any difference.

Saturday, February 03, 2007

Testing embeding table via Google spreadsheet again

A reader commented in this post:
"Hi, how did you remove the published via Google Docs & Spreadsheets - updated automatically every 5 minutes
title. Can't seem to fgure that out."

So testing embeding Google spreadsheet again due to reader's comment to see if anything has changed. Sample spreadsheet Blog*Star 2006 (alphbatical order) embedded below:


The method used was exactly as described in the post Testing embeding Gooogle spreadsheet in New Blogger (formerly beta) post.There is no "Published via Google Docs... or anything of that sort.